

Disclosure: When you click on links to various merchants on this site and make a purchase, this can result in this site earning a commission. Affiliate programs and affiliations include, but are not limited to, the eBay Partner Network
In this article I’ll show you how I installed a Diesel Heater Fuel Line Quick Disconnect Kit.
I bought mine here from dieselheat via eBay and I couldn’t be happier:
I no longer need to squeeze into the boot of my Jayco Swan to fill my diesel heater fuel tank using a jerrycan and funnel…
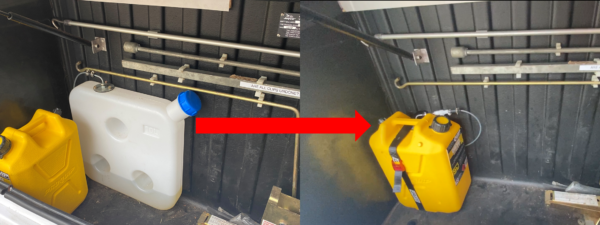
…because now the jerry can IS my fuel tank
[it’s easy to disconnect the jerry can with the click of a button then take it to the petrol station]
This one of the things I didn’t like when I initially did my diesel heater installation…
…so once I did this pretty simple mod, it made a HUGE difference to how I view my diesel heater
Read: My eBay Diesel Heater Review [Pros, Cons, FAQs]
Installation was easy too… here’s how I did it:
1. Buy a diesel heater fuel line quick disconnect kit
After shopping around I bought mine from dieselheat via eBay.
I bought this one for $38 (click here). I went the plastic one because it’ll be inside my boot…
…but if you’re mounting yours outside then you’ll need a metal one like this one because of the UV rays.
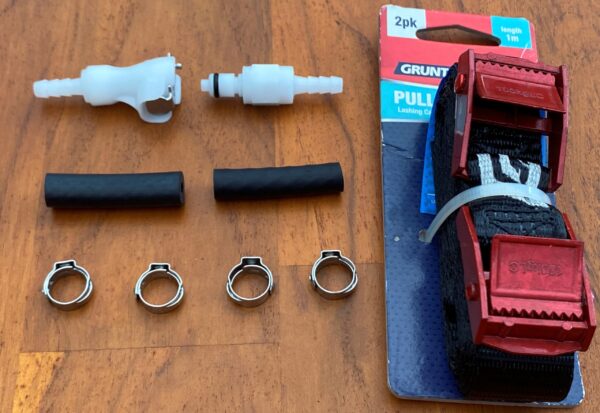
It came with everything that was needed for installation:
- Quick disconnect fittings
- Clamps, and
- Hose to fit existing fuel line
(I also bought a $5 Pull Tie Down from Bunnings to hold the jerry can in place)
NOTE: When I installed my diesel heater I used a Fuel Stand Pipe instead of a nozzle connector.
If you don’t have one you can get one pretty cheap here from eBay
2. Gather up the tools you’ll need
For the installation of the quick disconnect kit I used the following:
- Drill with 7 mm drill bit
- Driver with 8 mm nut driver socket
- Philips head screwdriver
- Long nose pliers
- Measuring tape
- Marker, and
- Hacksaw
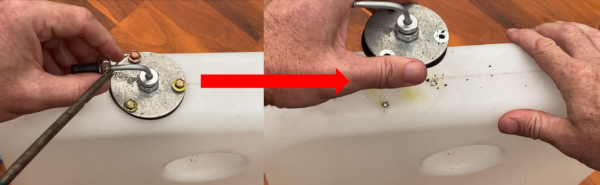
3. Remove the existing fuel tank
I used the Philips head screwdriver to undo the hose clamps, and used the driver-socket to undo the self-tapping screws that were holding the fuel tank in place
(a thing to consider is not spilling any diesel that’s in the fuel line)
4. Remove the fuel stand pipe and cut to size
I used the driver-socket to undo the self-tapping screws to remove the the Fuel Stand Pipe from the fuel tank.
Then I measured the height of the jerry can:
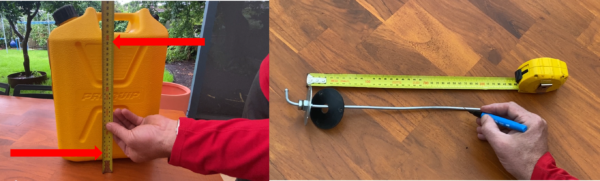
I then marked and cut the Fuel Stand Pipe with the hacksaw so that it was at a 45 degree angle with a length 50 mm above the bottom of the new tank.
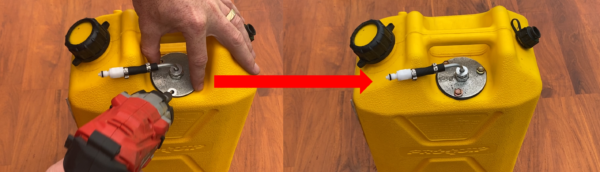
5. Drill hole in top of new tank for the fuel stand pipe
I used the rubber gasket from the Fuel Stand Pipe as a template…
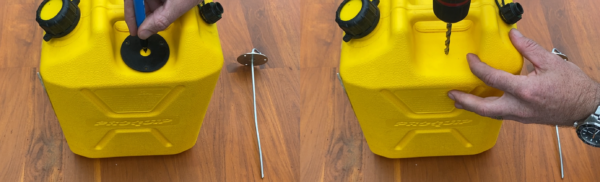
…then I used the drill and 7.5 mm bit to create a hole large enough for the widest part of the pipe to easily fit through.
6. Fix one side of the quick disconnect fitting to the fuel stand pipe
The good thing about this Quick Disconnect Kit that I bought from dieselheat via eBay is that both sides are valved:
Unless both sides are connected, no fuel will escape from either end.
I joined one piece to the Fuel Stand Pipe using the supplied hose…
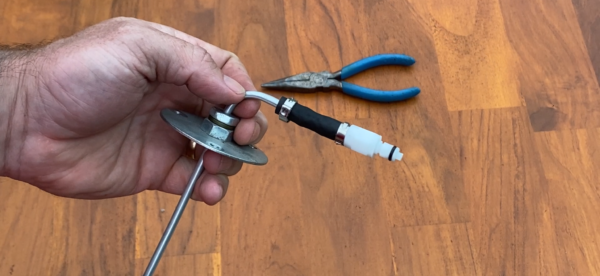
…and used the long-nose pliers to crimp the hose clamps shut.
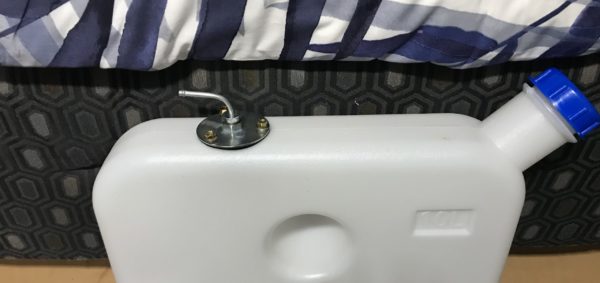
7. Attach the stand pipe to the jerry can
To attach the Fuel Stand Pipe to the jerry can I re-used the self-tapping screws from the original fuel tank
(I used the driver and socket again)
HINT: Before you do this, confirm the orientation of the nozzle of the Fuel Stand Pipe so that it’ll point the direction you want once it’s in location
8. Attach the other side of the quick disconnect fitting to the fuel line
To make this as easy as possible I:
- Added the hose to the quick disconnect fitting first, and
- Re-used the screw hose clamps from the orginal tank
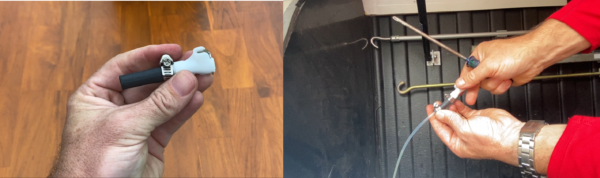
(I figured it’d be easier to use the screwdriver inside the boot rather than crimping the supplied hose clamps)
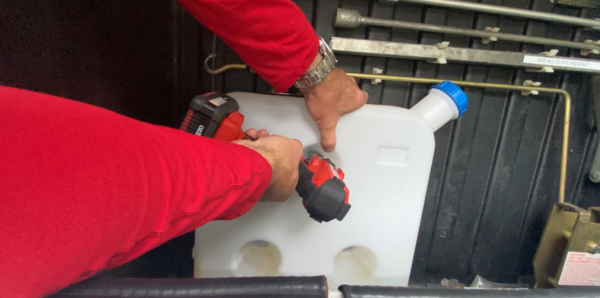
9. Create a tie down point
To do this I draped the Pull Tie Down over the jerry can so I could make sure the latch was in the right spot.
After marking the strap, I drilled some pilot holes into where the jerry can would live
(in our Jayco Swan the boot was ridged, so I made sure I went into the trough, rather than the peak, so the heads of the screws wouldn’t be against the jerry can)

Then I pushed the screws through the strap, then screwed it in place with some washers to hold it in place
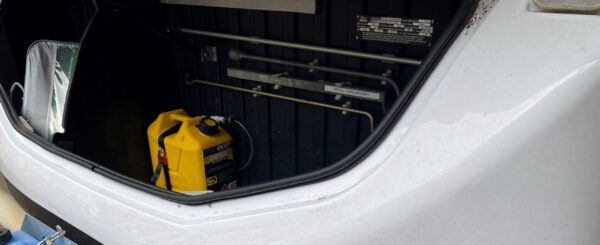
Done!
Summary: Installing a diesel heater fuel line quick disconnect kit
Using the standard diesel heater fuel tank definitely wasn’t one of these 13 Diesel Heater Installation Mistakes…
…but it definitely made my review of my diesel heater better
Installing a diesel heater fuel line quick disconnect kit was pretty straight forward.
I think it’s well worth the money:
It makes it easier to fill the tank on my diesel heater and it saves space too
If you’re interested in buying one then check out dieselheat here (or here for one of their metal ones) from their eBay store
Otherwise, check out where I first got started with diesel heaters…
![DO35 Hitch Lock Reviews [3 Best Options]](https://abigpeacheyadventure.com.au/wp-content/uploads/2019/09/Best-D035-Hitch-Lock-Reviews-440x264.png)
![7 Ways to Make Coffee in a Caravan [Powered and Unpowered]](https://abigpeacheyadventure.com.au/wp-content/uploads/2019/12/Making-Coffee-in-a-Caravan-7-Best-Options-440x264.png)
![20 Caravan Gadgets Under $20 [That Make Travelling Australia Easier]](https://abigpeacheyadventure.com.au/wp-content/uploads/2019/06/Best-Caravan-Gadgets-Australia-2019-440x264.png)