
![Jayco Swan Diesel Heater Installation [Step-By-Step With Pictures]](https://abigpeacheyadventure.com.au/wp-content/uploads/2020/06/Jayco-Swan-Diesel-Heater-Installation-Step-By-Step-1280x640.jpg)
Disclosure: When you click on links to various merchants on this site and make a purchase, this can result in this site earning a commission. Affiliate programs and affiliations include, but are not limited to, the eBay Partner Network
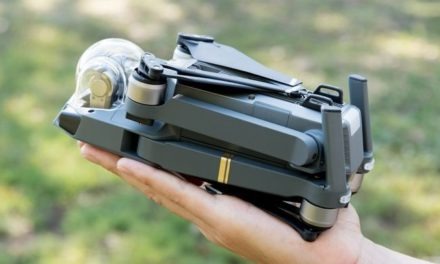
Here I’ll show you step-by-step how I installed a diesel heater in our Jayco Swan camper trailer.
Even though this is one of the 35 Most Popular Jayco Camper Trailer Modifications, it’s safe to say:
The instructions are useless.
So I spent A LOT of time researching how to do this…
(probably more than it took to install it)
…so I’ll also point out some of these 13 most common dos and don’ts I learned along the way.
Let’s get started with the first step:
1. Buy a diesel heater from eBay
If you’ve already got one, skip this bit and go to Step 2.
But if you haven’t?
Here’s the one I bought:
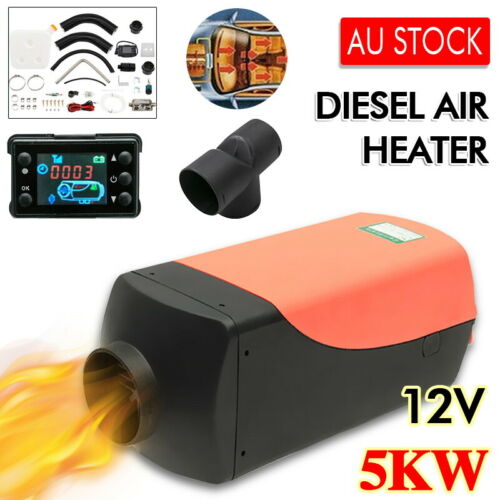
I’m very happy with it!
[Here’s its eBay link… the seller I bought it from has 99% positive feedback]
Yep, they’re affectionately known as ‘Cheap Chinese Diesel Heaters’…
…because they’re much cheaper than the original German versions BUT still consistently get the same good results
Now, should you buy a 2 kW or a 5 kW diesel heater?
There’s 2 schools of thought here:
- Buy the smaller one and work it harder so that it doesn’t get a build-up of carbon, OR
- Buy the larger one and don’t work it as hard so there’ll be less wear and tear on the fan and fuel pump (and just run it on high every now and again to burn away the carbon)
The guru of diesel heaters on YouTube (John McK) recommends the latter option…
…and since we’re in a Jayco Swan with a load of canvas, I figure it’s better to err on the side of warmer!
Read: 2kW vs 5kW Diesel Heater for Caravan or Camper [Pros and Cons]
When I bought mine from this eBay seller it arrived in 5 days from Sydney… bargain!
[I added to their 99% positive feedback]
Want to know why I went diesel instead of gas (after having a gas heater previously)?
Read: Gas vs Diesel Heaters: Pros, Cons, FAQs (and Myths)
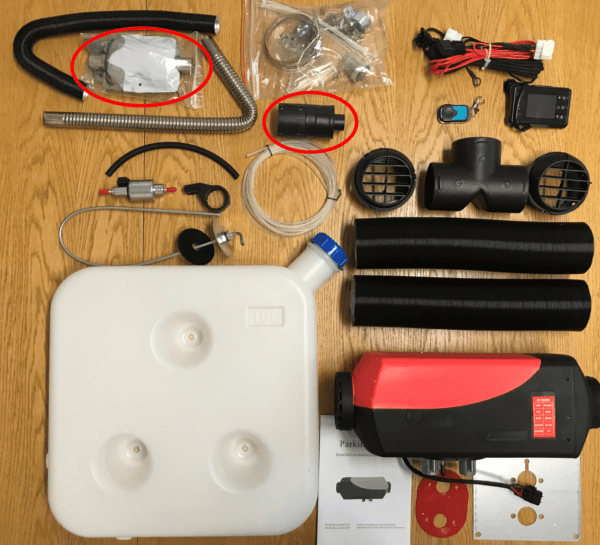
2. Unbox your diesel heater and check if there’s anything else you need for its installation
Like a little boy at Christmas, it was straight onto the kitchen table:
[Natalie wasn’t that impressed]
So what’s the deal with the red circles?
HINT: Make sure you get a diesel heater that comes with a muffler AND an air filter
Some of the diesel heaters are sold with “silencers” that look pretty much like the air filters…
…but bench testing shows they increase the noise!
And they don’t filter. Which makes them useless.
So if you already have your diesel heater BUT it didn’t come with either then this looks like a good combo from eBay
Anyway, here’s the extra bits I bought from Bunnings for our installation:
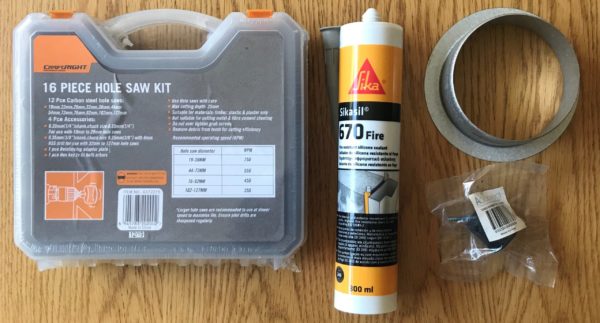
My shopping list was:
- Fielders 100mm Zinc Round Downpipe Pop. To create a turret to neaten up the hole in the floor ($6)
- Rubber Stopper. This is to help make the fuel pump more quiet ($3)
- Fire Resistant Silicon Sealant. To form a protective layer between the base plate and the floor ($17)
- Craftright 16 Piece Hole Saw Kit. You’ll need a 102 mm and a 76 mm hole… just a decent brand 102 mm hole saw is over $50. So yep, at $20 this cheapo set isn’t great quality, but it’s not like I’ll be using it all the time.
Also:
Double check to make sure you have:
- 12 small hose clamps, and
- 4 medium hose clamps
[my kit was short 2 of each so I had to do an extra trip to the local hardware store]
UPDATE: I’d also recommend buying a 12V isolator switch
This isn’t 100% needed, but a 12V isolator switch is handy to:
- Stop the LCD screen from drawing power when it’s not in use, and
- Preventing toddler from playing with the controls
I bought this one from this seller off eBay for about $20:
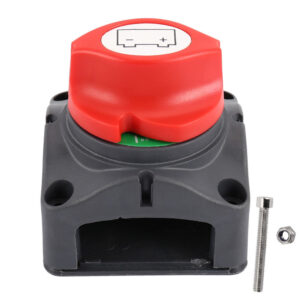
[the same type was $50 in an auto-parts store!]
3. Tools used for the diesel heater installation
This is everything I needed:
- Cordless drill and bits of all sizes
- Cordless driver and Philips head bit
- 102 mm hole saw
- 76 mm hole saw
- Socket set
- Spanner set
- Stanley knife
- Screwdrivers
- Caulking gun
- Hacksaw
Doesn’t look like a lot when it’s in a list… but it sure looked like a lot when I had it everywhere!
4. Find a good spot to put your diesel heater
There’s lots of different places you can put your diesel heater…
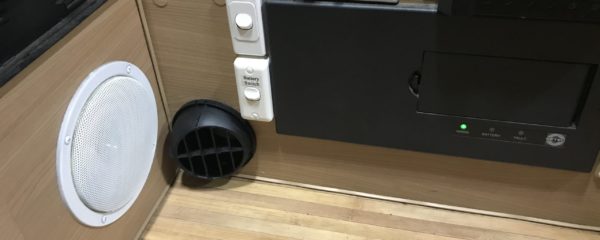
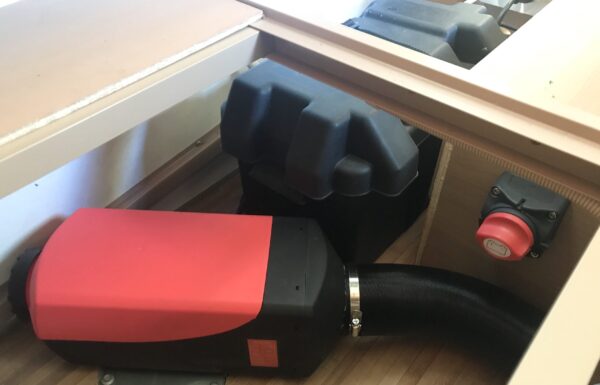
For our Jayco Swan (and our preferences) the only logical place seemed to be in the front right corner underneath the couch
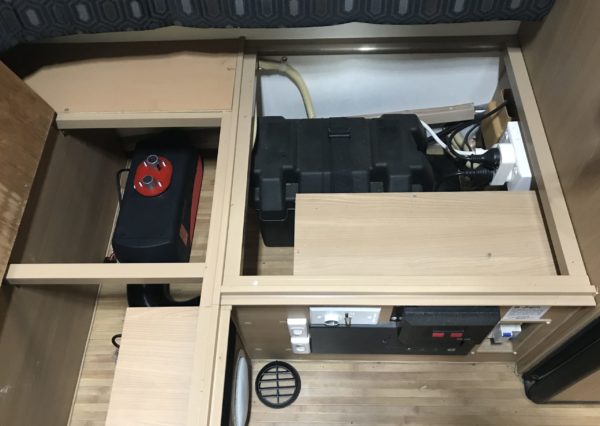
(the aftermarket radio and speakers meant I only had one option for the vent)
Some things to take into consideration when you’re choosing the location of your diesel heater are:
- What type of Jayco camper trailer layout do you have?
- What modifications have already been made?
- Are you willing to lose storage space?
- How far away is the battery?
- Where’s a good spot for the fuel can?
And the big one:
- What’s under the floor?
Before you do anything you’ll need to climb underneath to make sure there’s no chassis, gas pipes, or wiring in the way
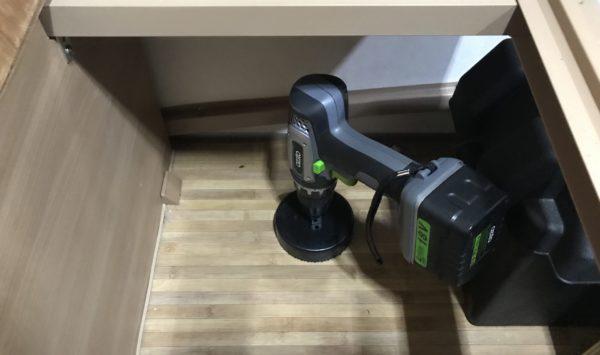
5. Mark, measure, and then drill a pilot hole to confirm the exact placement
The planned location for our diesel heater was pretty close to the chassis.
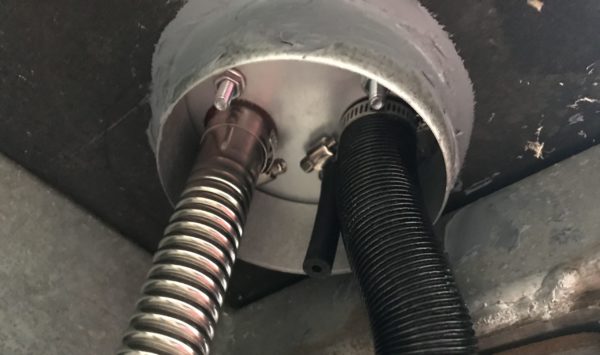
So I put the diesel heater on top of the downpipe pop turret
(so that I could confirm the exact location that the base plate would end up)
Then I took the heater away to leave the turret behind.
This meant I could drill a small pilot hole:
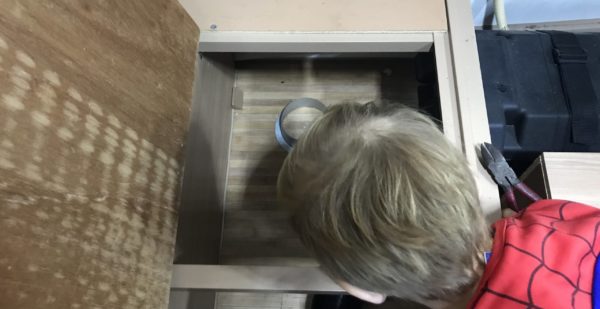
Spider-Man was glad I checked!
I climbed underneath and placed the centre of the turret over the pilot hole:
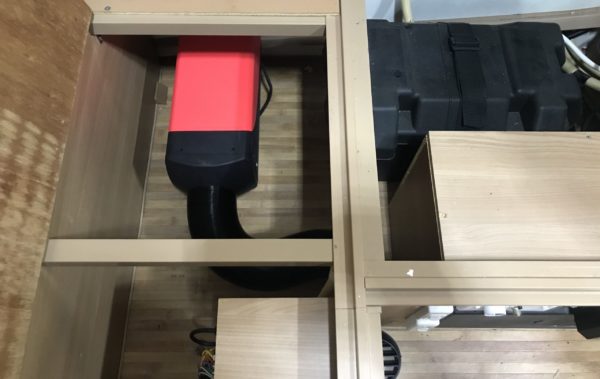
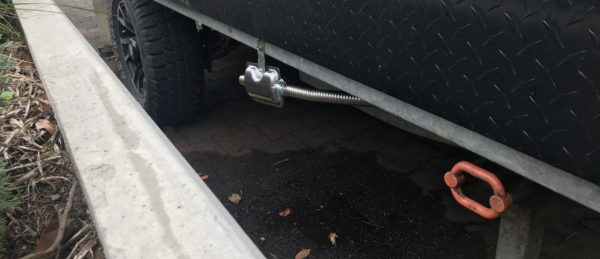
It was too close to the chassis by about 30 mm.
To move the diesel heater sideways by that distance would’ve put too much of a bend in the hose…
…so the final position was on an angle.
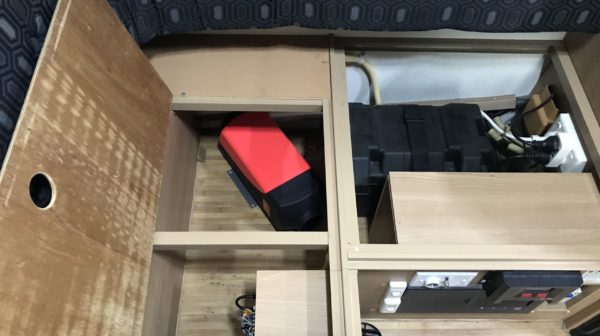
This picture shows the final position that was determined by both chassis location and vent placement.
6. Cut a hole in the floor using a hole saw
This was definitely a case of “measure twice, cut once“
You don’t need to have a big budget for this:
I used my el cheapo Craftright 102 mm hole saw on my el cheapo Ozito cordless drill:
Bunnings’ finest.
And it still did the job perfectly:

Spider-Man approves.
HINT: Cut a little from the top, then get underneath and cut from the bottom. You’ll get a MUCH neater hole.
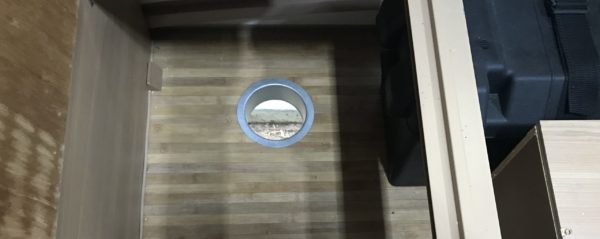
[It’s all about preventing water ingress]
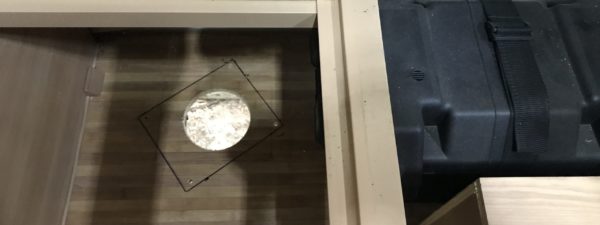
7. Outline base plate location and drill holes for securing the diesel heater to the floor
Pretty self explanatory:
8. Add a heat-resistant layer
A few different options here:
- Cut a small piece of concrete sheeting
- Cut up a heat-proof chopping board, or
- Use some fire resistant silicon sealant
I went for the last option to kill two birds with one stone (because I would’ve needed to get some silicon sealant to seal underneath anyway)
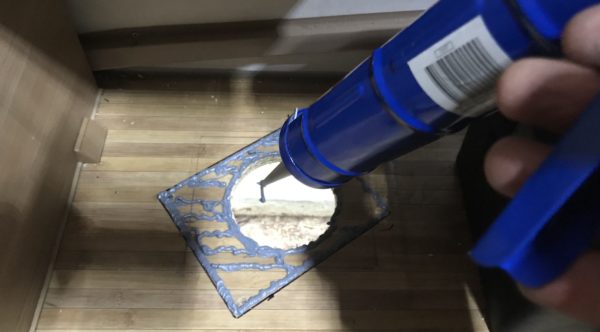
Yep, I did fill in all those gaps. That’s a lot of silicon.
9. Connect pipes and hoses to the base of the diesel heater
It’ll make things easier if you connect now
(rather than laying on your back underneath the van)
First, cut the black rubber hose into 6 even pieces
(these are the fuel-line connectors)
Here I’ve connected:
- Exhaust pipe
- Air intake hose pipe
- Fuel line connector
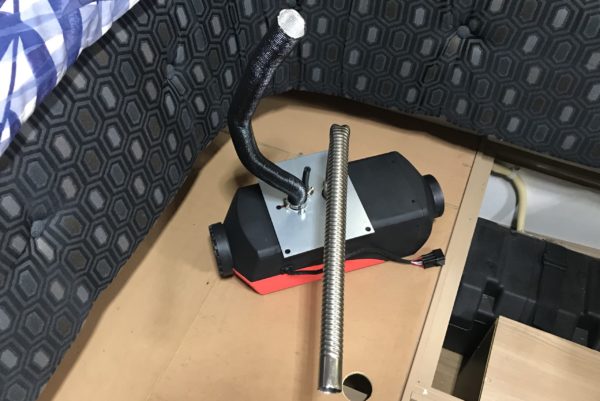
HINT: The fuel line is closest to the cool air intake hose, not the hot exhaust pipe… for obvious reasons
10. Put the diesel heater in position and seal the hole
Next I stuck the diesel heater in it’s final position…
…and used the silicone sealant to seal around the turret
11. Mount the exhaust pipe and connect the muffler
Okay, here’s where my initial plan would have let me down…
…I almost made 3 installation mistakes in one go!
First:
See the little hole on the bottom edge of the muffler?
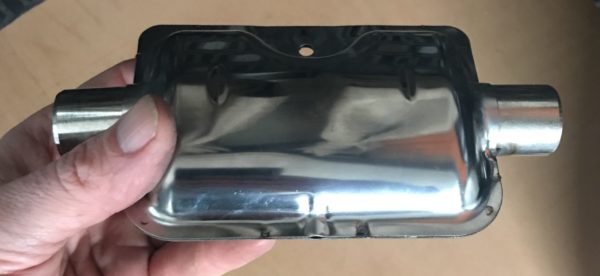
It’s a drainage ‘weep’ hole. It’s purpose is to allow water (a byproduce of the diesel heater’s combusion) to escape.
So yeah:
The muffler is mounted vertically, not on it’s side, to allow the water to drain out of the weep hole.
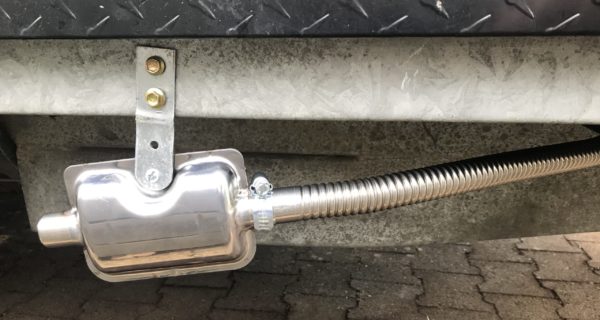
[I learned that AFTER I’d initially attached it… so I took it off, flattened the bracket, and reattached it]
The good news is when I did this it made it easier for me to avoid another common installation issue:
The exhaust pipe slopes slightly downwards to prevent water from collecting at the low point.
If there’s a bend in the pipe that’s lower than the exhaust outlet, water will collect there.
Here’s another angle of how it ended up pointing:
The exhaust points away from our van. Not under it.
Now, some might say that these are clean-burning and don’t produce much Carbon Monoxide…
…but all it’d take is for the heater to not be working properly, and next thing you know?
Carbon Monoxide trapped under the van.
No thanks.
12. Mount the air intake hose and connect the air filter
A few simple things here:
I mounted it so that it’s not sucking in the exhaust, and…
The air filter is facing backwards to avoid high pressure air, dirt, and bugs being pushed into the system when driving.
“And that, Spider-Man, is the heater mounted, exhaust fitted, and air intake sorted”
13. Mark and cut a hole (or holes) for the hot air vent
In this kit I got a T-Piece and 2 vents…
…but most people only ever install one vent.
So this was pretty simple:
I just traced around the base of the vent with a marker…
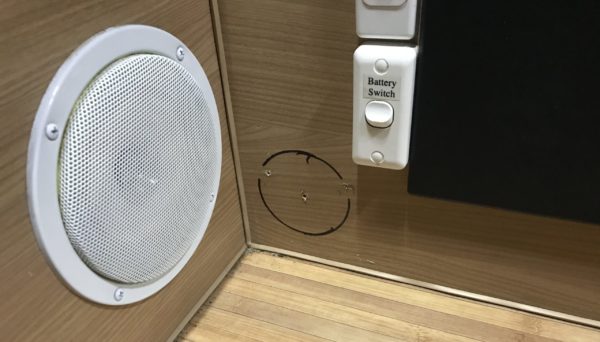
…then drilled it out using the 76 mm hole saw.
If these were the only 2 holes I got out of my Craftright Hole Saw Kit and then they fell apart, I’d still be happy!
14. Screw the hot air vent into its position
Pilot holes. Screws. Simple.

[my little “helper” is now a Dinosaur]
The vent cover now just snaps onto the base:
Orientated slightly downards, and towards the far end of our Jayco Swan.
15. Join the diesel heater to the vent with the duct pipe
Duct pipe, a couple of hose clamps, and a screw driver.
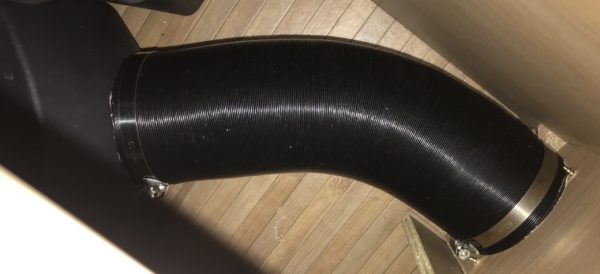
Nothing much can go wrong here
[just remember this will get HOT so it shouldn’t be up against anything]
“And that, T-Rex, is the hot air vent done”
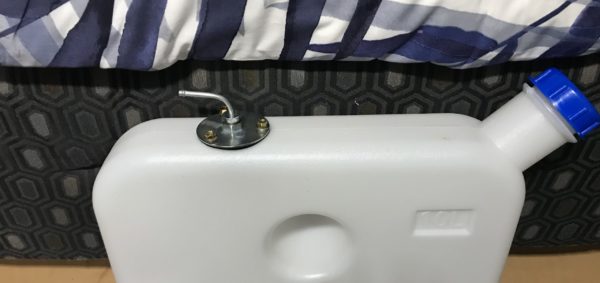
16. Fix the diesel fuel tank with the fittings to connect the fuel line
There was three options for the diesel heater that we bought.
You could either make a hole and insert a nozzle into reinforced sections on the bottom or side of the tank…
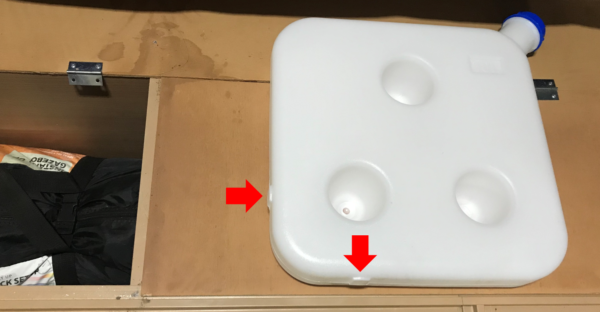
…or make a hole in the top and insert the Diesel Heater Fuel Standpipe:
You might’ve noticed that compared to the first photo in this little ‘how to’ I’ve cut the standpipe with my hacksaw to a length where it’s about 50 mm from the bottom with a 45 degree bevel…
…so you can probably guess which option I went for!
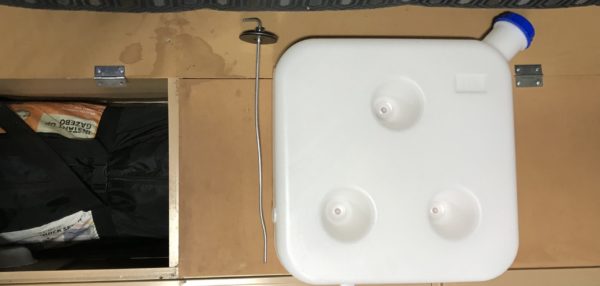
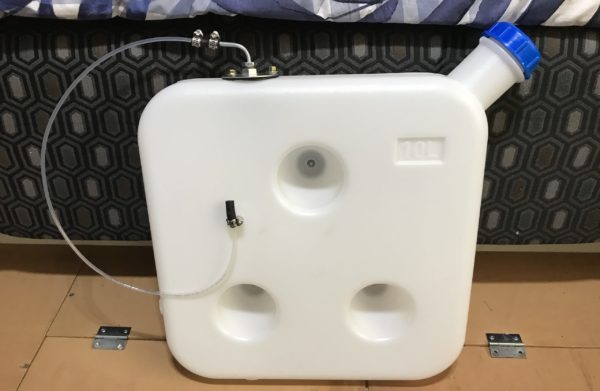
Reasons I didn’t got for bottom-mounted are:
- Notorious for leaking
- Can’t mount the tank with the base resting on anything for additional support
- More prone to sediment clogging up fuel lines
Side-mounted? None of those issues.
But you lose about a 1/4 of the tank capacity.
So after a few small holes and a couple of screws:
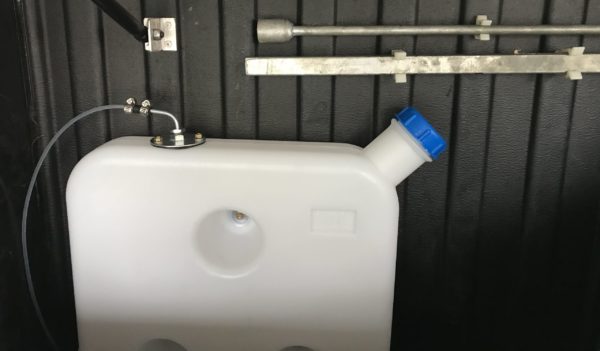
17. Make and measure a path for the fuel line
The resting place for our diesel heater fuel tank is in the boot of our Jayco Swan.
There’s already drainage holes in the boot so I didn’t have to drill any holes:

I wanted to keep the fuel filter outside because I didn’t like the idea of diesel leaking all through our boot…
…so I used a piece of string to measure the length of the fuel line I needed.
18. Cut the fuel line to length to join the diesel tank to the fuel filter
Using my trusty piece of string, I cut the fuel line on a chopping board using a sharp Stanley Knife
[NOT a pair of scissors or side-cutters because it can compress the narrow diameter fuel line]
A couple of things to note here:
- I’ve used 2 more bits of the black rubber hose that was cut into 6 pieces to act as connectors
- There’s no gap between the end of the hose and the fuel standpipe nozzzle (pushed tight)
- I’ve intentionally used the fuel line that it came with
Some people feel the need to upgrade the hard nylon fuel line it comes with to what is used on a car or motorcycle.
If you’re interested there’s a 23 minute video on YouTube just on the fuel delivery system that changed my mind:
I nearly “upgraded” to a fuel hose from SupaCheap Auto… until I learned that the hard nylon narrow-bore fuel line is designed specifically for these systems.
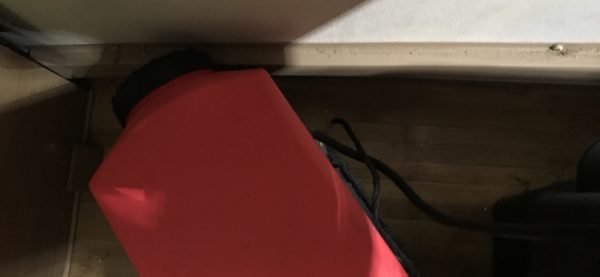
19. Mount the diesel fuel tank
Here I’ve mounted ours in the boot of our Jayco Swan:
It’s dark. Protected from rocks. Free from interference from people.
It’s only mounted using the 3 tech screws and washers in the pre-drilled holes though:
Another reason I wanted to make sure that the base of the tank was supported.
I was paranoid that I’d go over a bump and the screws would pull through the tank and it’d fall off
[I haven’t heard of that happening before… but you know, belts-and-braces]
UPDATE: I’ve just changed the fuel tank to using a jerry can that has a Quick Disconnect Kit that I bought here from dieselheat off eBay for $38…
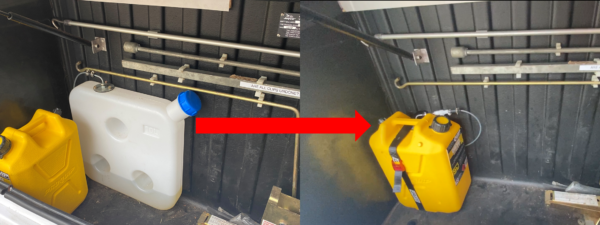
…this saves space in the boot, and makes it easier to refill as I can just take the jerry can with me
Read: Diesel Heater Fuel Line Quick Disconnect: Installation and Review
20. Mount the fuel pump (close to the tank)
So I learned that these fuel dosing pumps are more efficient at pushing than they are at sucking…
…so you mount them closer to the fuel tank, not closer to the diesel heater itself.
But they’re also notorious for making a maddening ticking noise
Read: 7 Tips To Quieten Your Diesel Heater Fuel Pump Noise
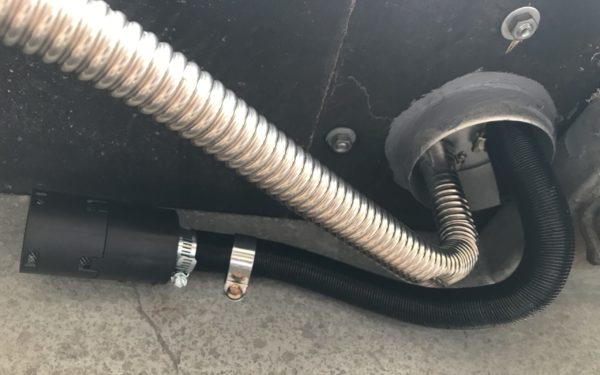
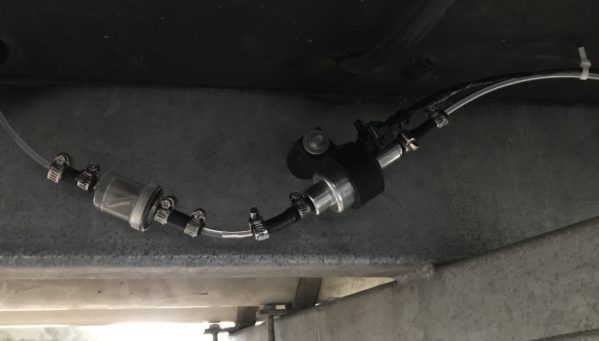
I came across this great idea of placing a rubber stopper between the Fuel Pump Clip and the chassis:
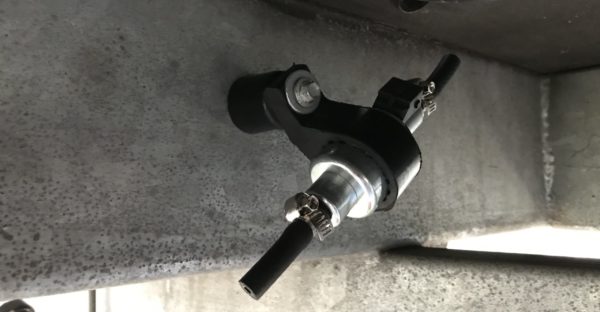
But also:
The fuel pump is mounted at an angle so the air bubbles created by the pump’s cavitation can escape… if they can’t it messes with the fuel dosage and also creates a metal-on-metal situation.
21. Attach the fuel filter
Remeber:
Unlike a swimming pool filter, diesel fuel filters are designed so that the incoming fuel comes into the outside of the basket.
This is the correct orientation:
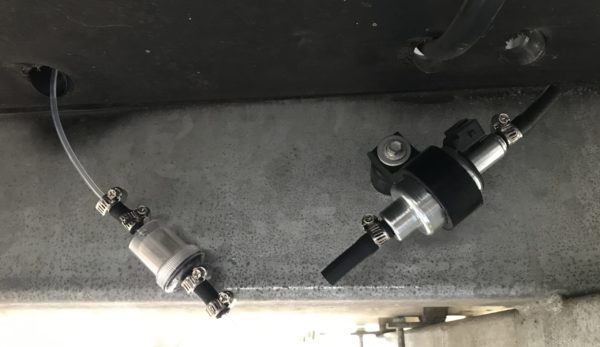
Also:
The fuel filter is mounted before the fuel pump
(otherwise the fuel pump will get clogged up)
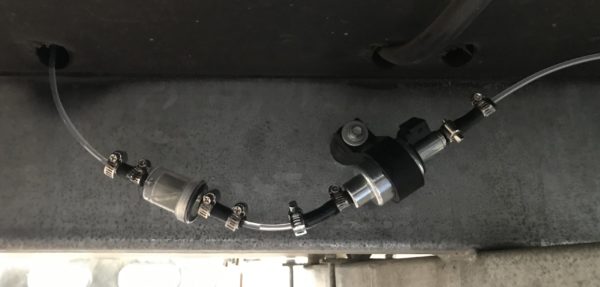
22. Connect the fuel pump to a primed fuel line
Here I used the piece of string to find the right length to join the fuel pump to the base of the diesel heater
Then, for the final piece of this puzzle:
I cut a piece to join the fuel pump to the fuel filter.
But before I connected the dots, I made sure I primed the fuel line:
Otherwise:
The poor little fuel pump would have been grinding away, metal on metal, around 15,000 times before it managed to get it’s first sip of diesel
[And if it hadn’t had a meltdown, it’d surely have some arthrits for the future]
So now we have a mounted diesel heater, with vents, and a fully connected fuel system…
23. Connect the wiring harness to the fuel pump
The wiring for these things was the simplest part of the installation:
They are all VERY different connectors so you couldn’t stuff it up if you tried.
For the wires for the fuel pump I drilled a small hole, popped off the connector, and fed the wires through the hole:
Then re-joined the connector, plugged it in, and neatened everything up with some cable-ties:
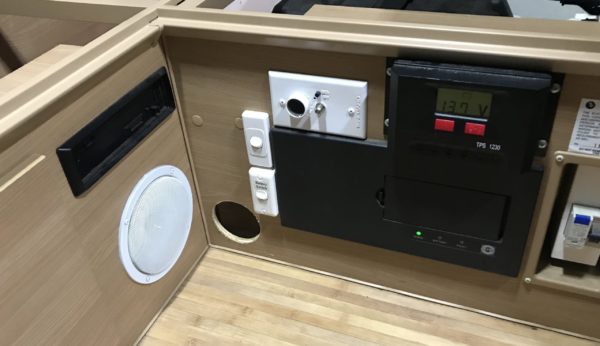
24. Mount the Digital Thermostat Controller
Spoiler Alert!
I failed to take a photo on this step… so here’s one that I took AFTER the final step!
This was pretty easy though:
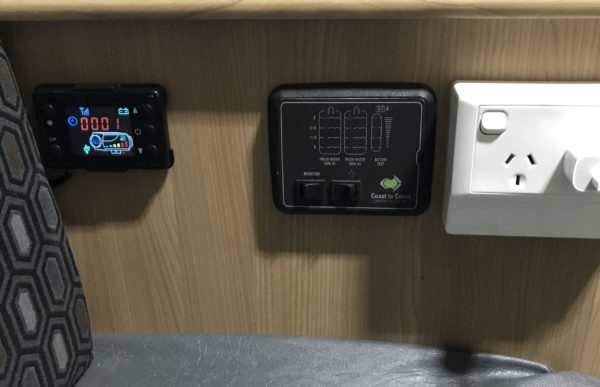
Join the only 2 connectors that fit each other.
Screw the back of the controller into the wall.
Hide the wires.
Then…
25. Connect the wiring harness to the battery
This step was simple:
The wiring harness came with a long red wire (that has a fuse in it).
Attach the red wire to the red terminal on the battery.
Then, attach the black wire to the black terminal on the battery.
Once I did that…
26. Test the diesel heater to make sure it works
I pressed the ‘On’ button, and it worked. Very Well.
I let it run for about 10 minutes on high.
It was very warm.
Good news:
The rubber stopper worked…
…no ticking noise!
How hot does the case of a diesel heater get?
This was the result after 10 minutes on high:
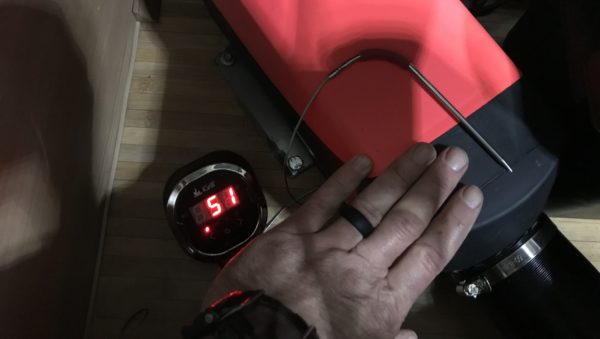
Yes, that’s my comfortably holding my hand on it.
How hot does the base plate of the diesel heater get?
Here’s the meat thermometer again:
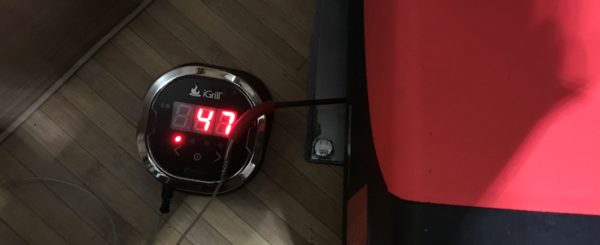
Definitely warm to touch… but I couldn’t fry an egg on it.
27. UPDATE: Install a 12V isolator switch
This one is an update, a modification that I put in towards the end of winter…
…I installed this 12V isolator switch that I bought here off eBay underneath the seat
[where it’s easily accessible, but little hands can’t reach it]
The reasons for this were:
- Stop the LCD unneccessarily drawing power when not in use, and
- Stopping our little Eddie from playing with the controller
I think it’s $20 well spent!
Summary: we’re happy with our Jayco Swan diesel heater installation
We’re happy with our diesel heater…
…it’s definitely going to make life in our Jayco Swan more comfortable this winter!
[It’s one of these 7 Tips to Keep Your Jayco Camper Trailer Warmer in Winter]
As I was writing this I said to Natalie:
“This is the article I wish I had when I was installing our diesel heater”
So comment below:
Is there any steps you want more detail on? Anything I’ve missed?
If you’re after one of these diesel heaters, here’s the eBay link to one like we bought
While you’re at it, make sure you get a Carbon Monoxide detector too. We have this one by Quell:
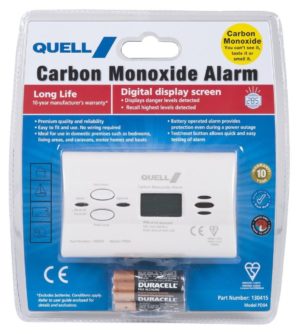
They’re about $45 from eBay, or just pop down to Bunnings and get one (more like $60 there though)
Otherwise, keep warm, and you might find some other idease here at the 35 Most Popular Jayco Camper Trailer Modifications
![Caravan First Aid Kit: 33 Essential Items [Checklist]](https://abigpeacheyadventure.com.au/wp-content/uploads/2019/08/Things-to-buy-for-a-new-caravan-First-Aid-Kit-440x264.jpg)
I installed my diesel heater exactly the same , only extra bit I did was put an in-line power switch under the dinette seat next to main unit to shut of LCD if van is parked up for while ,
Cheers Stuart
Hi Stuart, great idea! I don’t love the idea of the LCD drawing current when it’s not being used (like in Summer!). I’ll be doing the same… thank you!
Great article and thanks for all your amazing tips! Wondering where you installed the Carbon Monoxide alarm? Do you have any photos? Thanks
Hi Todd, it’s on the tall wardrobe (about mid way up). Carbon Monoxide is slightly lighter than air and evenly diffuses around a room. Cheers!
Thanks Michael, I’m 2/3 the way to install and found your guide , my concern was exhaust pipe through ply wood floor and possible fire issue. I see you have used a separate base plate and cut out the whole section that inlet and exhaust and fuel delivery come thru. Certain in takes away any wooden floor contact with exhaust pipe. Thanks for the idea. Greg.
Hi Michael. I couldn’t have installed without your guide.
Thx mate
Hi Michael Great article and the ISOLATION switch should be a MUST as some heaters with remotes have started up on many occasions from stray signals from other remotes or extraneous sources while no one is in the van. This happened to a mate of mine several times so now he has an isolator switch. No more problems.
Cheers John
Thanks for the article, very informative and has got me thinking now. Loving the site. What where you doing previously to keep warm?
Hi Rex, thanks! For powered sites we use a small electric blow heater. In our old van we had a gas heater (that was in it when we bought it). I kept hearing good things about these diesel heaters, so decided to go with one for our new-to-us Swan… glad I did it!
Just wondering if you can remember how to get the pump plug off?
Thanks for the write up. It has given me the confidence to do it. I can’t wait to do it this weekend. I have had mates tell me it is easy but with the explanation and photos as a guide it looks simple. Thanks again
Hi Phil,
That’s great to hear – thanks for the feedback!
Cheers,
Michael and Natalie
Hey champ, great article. I am planning my install and hoping you could send me the eBay link for the one you purchased? The link in the write directs me to the search page, but I’m after the specific price/seller details if you can share?
Hi Dave, this should be all working now (they were out of stock). Cheers, Michael
I used a rectangular 100 x 75mm downpipe flange and cut it in with a multi tool. The result was quite good and gives a little more space to access fuel line and inlet/outlet ports. Don’t know how to add photos but have some
Hi Paul,
That sounds like a good way to do it too!
Cheers,
Michael
Simply a brilliant consise detailed explanation of the installation process.
Thank you soooo much, makes me a load more confident in installing mine down the track. A couple interesting helpful tips in the rubber block between chassis on the dosing pump and considering using the fuel stand pipe to avoid a possible leak, suckle any debris and allow the tank to rest on its base.
Again many thanks for a great post.
Cheers
Mike
Hi Mike,
Thank you! Glad it’s of help, feel free to sing out if you have any questions when it comes time to doing your install
Michael and Natalie
Great details for installing the heater. My question relates to the “priming” of the fuel pump. What is the best way to achieve this step?
Hi Roger, the best way to do it is to get a small hand-pump primer from the hardware. I’d never recommend in writing that you just suck on it the old fashion way… if you did that, it might take one gentle suck, the diesel would then pull itself through, and then you would just connect it up. But no, couldn’t recommend this 😉
Clever reply
Some good tips, thanks, I’m about to install one into a side fold camper trailer which presents a few more challenge’s … but yeah good tips
Hi Shane,
Thank you! Yeah, I can imagine it’d be a bit different in the side fold camper, would love to see pics when you’re done!
Michael and Natalie
Great post.
I don’t have a Jayco (have a forward fold camper) which I’ll be doing this to.
One thing I think would be good is to put in an isolation switch due to the current draw on the unit when off.
Minimal but still draws electricity.
Putting this switch in the control panel avoids accidentally turning it off when running which would stop the cool down cycle to run…
Hi Scott, thank you. I like the idea of the isolation switch, and will put one in. Cheers, Michael
Congrats on a great article..very informative..and yes I’m about to go out and change the position of the exhaust and muffler after installing it yesterday..only regret is I didn’t read your article first..
I’m installing a heater in a week and have pondered the isolation switch notion. If it’s just about current draw to the controller, then a simple switch on the controller red wire would do the trick, and there would be no accidental power loss to the burner. Just thinking for now.
Hi George, you’re right, a simple switch would do the same job
Hi Michael, great write up. I have a couple of questions. My heater appears to have come with 2 controllers, a digital one and a simple one with just on, off and a dial. Are they giving me the option of either?
Also the exhaust pipe is very loose fitting and the supplied hose clamps won’t tighten enough. Did you have a similar problem. I don’t want a leaky exhaust.
Thanks
Paul
Hi Paul, I have seen that both controllers can be used (and I’d assume the ones they sent are compatible… easy to check once it’s in though). Personally, I’d stick with the digital one as it gives more control. Didn’t have the same problem with the loose fitting exhaust though, might be worth popping down to the hardware and getting some stronger hoseclamps as that might help?
Hi Michael
Regarding the rubber stopper used with the fuel pump, what is it actually called and what area of Bunnings is it located in? Cheers for the informative installation. Bill
Hi Bill, it’s the “Adoored 30mm Black Rubber Round Door Stop Cushion”… it’s around the hardware / fittings section. Cheers, Michael
I’m installing my heater in and cut the wires for the fuel pump and ran them thru the floor, only to notice those 2 wires are booth black with green line thru them now I don’t know which wire is which.
My question is does it matter which why these 2 wires go .
Hi Sam,
The wiring of the diesel heaters’ fuel pumps are generally non-polarised so it shouldn’t matter
Cheers,
Michael
Hi- Just wondering if there is a trick to getting the fuel tube into and out of the tank at the top? I’ve got a similar one to yours and am about to start fitting it. Thanks Howie
Hi Howard,
I’ve permanently mounted mine – drilled a hole for the standpipe, then screwed it in. To refill diesel, I’ve both done it from the bowser when filling up the car, and also used a small jerry can with nozzle
Hope that helps… if not, feel free to ask more 🙂
Michael
Hi Michael, mine must be different as I will have to pull the pipe through from the inside of the tank and screw the rubber washer and plate on the outside. All good- thanks for the reply.
Hi Michael, how have you found the heater now in winter? Have you had any issues with the unit and do you still recommend these cheaper brands.
I ask this as I am in the process of acquiring a heater for my van and am checking out all the possibilities for the best unit to purchase.
Hi John, we used this last week in the Flinders Ranges… it was a game changer. The temps were 1-2deg overnight, and we were toasty. Only used a few litres of diesel over 4 nights. It’s safe to say we’ve already got our money’s worth from this thing! And no, no problems with it
Great article thanks Michael. Was tossing if I should get one or something else but now think will get one after reading this. My only question does the heater smell of diesel?
Cheers
John
Hi John, thank you! No, no diesel smell (a fan blows heat off a completely sealed unit, much like how a car heater works). Surprisingly, even from outside you can hardly smell any exhaust when you’re right next to the muffler. Cheers, Michael
Hey Michael, All the articles that you guys post are great. This is a very well done and informative post I will stop a lot of blokes getting the “I told you we should have got someone to fit it” for the boss or better half. Keep up with the great work. I haven’t gone down the Diesel heater path yet, but since the better half has found you blogs I’m sure you will be costing me a lot more money in the future. All good ideas are worth every penny cheers Jason
Ha ha, thanks for the kind words, sorry to be costing you more money. It’s addictive isn’t it!
A couple of basic questions Michael. But firstly I am loving your blow by blow install instructions. Ive bought the same heater and am looking for ward to giving is a go! Approx how long did the install take and do you feel having used it that its a safe unit to run through the night?
Hi Lachlan, took all day, but that was because I spent most of the time watching YouTube videos of how to install it so I wouldn’t stuff it up. In terms of hands-on time, probably 3ish hours. Now that we’ve used it a bit, I feel safe to run through the night… had it going overnight a few times in the Flinders Ranges recently. It was amazing, and glad we did it. Cheers!
My heater didn’t come with fuel line connector tubing?
Is it necessary and how do you join the connectors to the fuel line?
Your instructions were invaluable today!! Can’t thank you enough.
Hi Lachlan, thank you! The fuel line connectors comes as a single 15-20cm piece of rubber hosing that you cut up into little pieces. The internal diameter of it is a size that means you can fit the fuel line inside. Cheers!
Hi Michael, Thank you so much for a very detailed and easy to follow instructions to install the heater. We just finished installing ours and followed your instructions to the letter and it all went really smoothly, even the procedure you used to prime the fuel line by gently sucking it but you would not publically admit it 🙂 diesel doesn’t taste that bad!! We also used the stand pipe, the door stop, the downpipe top and the fire retardant sealant.
We tested the heater after the installation and it worked a treat!! We are stocked and can’t wait to take the camper to cooler climate something we avoided at all cost in the past.
The only thing we did differently and that was done after we tested and made sure everything worked, was to connect the heater to the camper battery management box. We had a spare connection and we used that, so the heater is now incorporated with the other stuff and it is only on when the switch box is on so we will not have the controller’s LCD lit all the time, only when we need it.
We could do with better operation and setting instructions of the heater, the manual is absolutely useless and poorly written, luckily there are plenty videos on Youtube that explain what buttons to press for the different setup options. The chinese tell you to press a button “long time” but don’t say how long is a long time, we figured it out that long time is basically two seconds!!
Once again, thank you for the great write ups, one less to do of the 35 most popular Jayco camper trailer mods!!
Hi Orlando, thank you, and good pick up on the diesel priming 😉 Good work I’m isolating the LCD, I’ll be putting an isolator in too. Cheers, Michael
Curious why you went with a single hole versus 2 holes for the pipes and screw holes. What is the pros/cons of this approach?
Hi Corey, I went with the single hole because then it was a plain round hole to neatly drill with a hole saw, and could then fit the downpipe pop into it so could seal it to stop water ingress. Cheers!
How do you pull the wires out of the plug for the screen
Hi Brian, I didn’t pull the wires out of the back of the screen; an option is to drill a hole large enough for the plug, then screw the base over the top
You convinced me to get one. I have gone for the portable version though. Intend to mount on a wide base and attach a longer outlet pipe.
Mine is the version that looks like an old computer tower. Hopefully I can work it out in time to test on TW1…
Hey Chris, good one! Will be keen to see the portable one in action next time you set-up the CP 🙂
Hi Michael, thanks for the interesting article on installing your diesel heater, you made it look so easy! I’m wondering if you know whether a printed manual is available for the LCD controller? I’ve just installed my heater but am having trouble trying to decipher the instructions in the very poorly written leaflet that came with the heater. Regards, John
Hi John, no, couldn’t find one myself… I had to use YouTube for that part!
Hi my heater didn’t come with the rubber hose to cut into pieces to connect the fuel line. Do I need this rubber hose or am I able to just connect the fuel line to the fuel pump and other bits?
Hi Glen, if yours came with the hose that’s a wider diameter and it fits over the nozzles then you don’t need the black connector hose
ola
thank you so much for all the details and information
what is your recomedation to conect the heater to 220v?
the van will not move any more 🙂
thank
tamir
Hi Tamir, if you’re connecting to 220/240V my recommendation would be to use a licensed electrician. Cheers!
Thank you very much for help with fuel line. I have to ask, do you have a write up on LCD operation and menus? It seems confusing, all I know is more or less power from 1-5 ???
Please write back.
Hi Brandon, we don’t… but I’ll add it to the list (you’re not the first person who has asked… the instructions are terrible!)
This is a life saver. I really appreciate that you have taken the time to go into detail and make installation almost idiot proof. It is certainly going to save me heaps of time, angst and guesswork not to mention the 215 trips to the hardware store.
Hey Michael,
Just wondering when you laid down the silicone base, did you let it set , then bolt down the heater or did you fix and tighten to the floor straight away…?
Hi mate, let it set for a while first
Great instruction Michael. Im on the Jayco camper site also.
Michael, what I’d like to add is the exhaust should be pointed out the non awning side and not out under a bed. It was a rookie mistake by me. Fumes came into the cabin the second night with the breeze in the right direction. No fumes since.
Also I ran the fuel line in some cheap clear tubing to protect it from stones etc under the van.
Cheers.
Hi Michael,
Fantastic work on the site, we’ve been working our way through most of your mods and really appreciate the time and effort you put into all these guides. We did the heater install on the weekend, all went very smoothly thanks to your instructions. We’ve only run through a few tests, but all seems to be working well.
Thanks again!
Matt
Great article, much appreciated! Weather depending, hoping I can do the install this weekend in our Jayco Swan.
One thing I was wondering about was the return air. How have you found the air supply into the underbench area of your install? Is it sufficient via the nooks and crannies in the seating and cabinetry, or have you installed a seperate vent to allow air in?
Hi Joe, thank you! We’ve found no problems with the air intake, plenty comes in through the nooks and crannies
Awesome post – thanks for taking the time to put it up. I’m still doing my research but I think this has almost tipped me over the edge to get the cheaper chinese brand over the much more expensive european brands.
One quick Q – do you find the temperature control / thermostat works well to maintain a steady temp ?
I have an idea of getting a temp or 15-20 degree’s… so will be interesting to hear how you go !
Thanks again
Hi Mike, the thermostat on the diesel heater doesn’t keep it at the desired temp due to difference in temp near the heater outlet and the bed ends… so we run it on manual Hz mode
Hi Michael,
thanks for all the great info, followed most if not all of you advice. I had two minor issues, one is the ticking of the fuel pump, it is outside the van but under our bed, used your idea of the rubber stopper. Am considering wrapping it in a bit of pool noodle to insulate and suspend from the floor of the van instead of bolting it to the chassis.
The other problem I had was and E-06 error. All sites said this was a fan problem, couldn’t rectify so pulled out everything and plugged in, ran fine. Reinstalled everything with same problem. After much scouring of the internet found it was the exhaust shorting out the system on the chassis and not the fan at all. Something to keep in mind for others who might encounter the same problem.
Otherwise was a good experience, big shout out to Stephen at AUFocus in Moorabbin, Vic where I bought mine from, very helpful with tips, advice and troubleshooting.
Thanks again for the inspiration to give this a go, wife loves it.
Regards,
Andrew
Hi Andrew, great to hear you solved that problem, and also great to hear that you got some great customer service from Stephen! With regards to the ticking noise, this might be of help: 7 Tips To Quieten Your Diesel Heater Fuel Pump Noise
G’day Michael. As many have already said, thanks so much for this article! It will give me plenty of tips to take into an install that will begin shortly but I wanted to ask a question – with your 12V isolator switch, how did you wire it up? I’m not on top of 12V wiring so can you please run through it from the battery, all the way through to the heater? Do you wire it up on the positive or negative lead and is there a chance that when you isolate the heater, that it also isolates all connections from the battery or just the heater? I hope my question is clear so it may pay to dumb it down a bit! :p
Hey mate, thank you! I inserted the switch in the red positive between the battery and the unit… this means it isolated the entire heater, not just the display panel. Hope this helps!
Hi, thanks for the great tutorial and comments from your followers. You said your heater came from Sydney, bur I followed the link you provided and it said it came from Victoria, tried to contact them and they do not reply. Was your seller cysuntaioutdoor (5760) ?
Thanks Dave
Hi David, yes, that was the seller, cysuntaioutdoor. I was certain they were from Sydney?!
Hi mate. Does the shut off switch to the display have to be one of those large ones you use or can I use a properly rated rocker switch instead. Also, I guess you would put the switch on the earth wire?
Great site mate and keep up the good work
Garry
Hi Garry, thank you! No, it doesn’t need to be one of these big ones, as long as it’s rated to 20A. I put the switch on the positive wire (after checking with a couple of my electrician mates)
Hi Michael
Can you explain how to connect an isolation switch, the rest of your instructions were simply awesome
Thanks
Daniel
Hi Daniel, thanks mate! The isolation switch had 2 terminals on it… I cut-and-stripped the positive wire, and attached them directly to the terminals on the switch (I checked with 3 different electricians first, they all recommended doing it on the positive wire rather than the negative)
Hi Michael . Just a question on how you got the fuel stand pipe into the plastic tank. The smaller nozzle are easy done with wire but I can’t find anywhere how to fit the stand pipe in to the top of the plastic tank. Regards Vince
Hi Vince, for this I: Cut the standpipe to length, drilled a small hole in the top of the tank, inserted the standpipe, then screwed it in from the top (there was 4 holes in the round metal disc that sits on the external top of the tank)
Thanks Michael.. the stand pipe I was supplied with has a 25 mil threaded shaft through which a smaller “fuel “ pipe is fitted which is held on by a large nut under which sits a rubber washer and a metal round cover. There is also a “flange” that sits inside the plastic tank to stop it pulling through. I have a picture of it but can’t add it to this post. Vince
Just a follow up re stand pipe. I got it in using some nylon fishing line and some fancy bending of the pipe. Thanks for the post very helpful with the rest of the instal.
Regards VInce
Great article for beginners like me.
Looking at installing mine similar to this, wondering about the location of the air to be heated inlet being under the seat.
I thought that there would not be sufficient fresh air flow ?
Mark
Hi Mark, thank you! I had the same thought initially, read about heaps of others who’d done the same with no problems. We’ve had no drama with it there, and no different to how it runs when tested with the lid up
Hi Michael,
I’ve had a look though this all but am wondering after this much time and use how you feel about your decision to go 5kw instead of 2kw? Do you end up running on low most of the time, or mix it up?
I will be buying one for install into a Goldstream wind-up camper—virtually the same as jayco swan or similar and am trying to decide on what size/capacity. My partner gets very cold, me not so much, and I don’t want to cook myself!
Have you kept up with the current crop of Chinese heaters and have any preferences?
Thanks for all your work! This will be priceless for my install.
Hi Hans, so far we’ve had no regrets going with the 5kW diesel heater for our Jayco Swan. We found that with the amount of heat loss from the canvas (and the door vent) we don’t always even have it on low!
G’day Peachy,
I shall soon (ie when I get my camper) be following your instructions for the install of the heater but here’s a question — which you may have already answered but if so I didn’t see:
It’s likely that I shall be doing some river crossings eg on the Gibb and I am wondering if I need to take extra precautions to stop water entering the van through the floor, or any other holes.
Thanks for the piece.
Hi Tony, thank you – if you’re installing a diesel heater, then yes, it’s worth sealing around where the heater goes through the floor of your camper. This is why I was very particular about using a circular saw and the downpipe pop, and using some sealant around everything
Gunna buy and give this a crack in my camper. Hoping it goes ok without a hitch. Is the quick release from dieselheat now the $39 one? Would love to see a closer pic of that if possible please? And how did you run the fuel line from the jerry can out of the boot down to the filter/pump?
Hi Kelli, yes, we got the diesel heater fuel line quick disconnect from Diesel Heat. There’s some closer pics of the installation in here: Diesel Heater Fuel Line Quick Disconnect: Installation and Review
Excellent article! Very helpful and informative – thank you!! I am about to under take this task in a Flamingo, so this was great to read prior to doing the job! Thanks!