Disclosure: When you click on links to various merchants on this site and make a purchase, this can result in this site earning a commission. Affiliate programs and affiliations include, but are not limited to, the eBay Partner Network
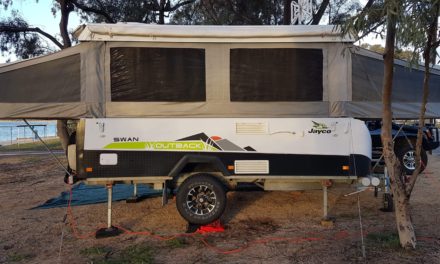
Here I’ll show you the results of our Jayco Swan bed end fly modification.
We used the Supa Peg Jayco Bed Fly Conversion Kit (that you can get from eBay).
This mod is one of the 35 Most Popular Jayco Camper Trailer Modifications…
…and I totally get why!
But first:
What is the bed end fly modification?
Installing bed end flys on a Jayco camper trailer is considered a must
(for lots of reasons)
But… it means extra poles and extra guy ropes
This modification converts the bed fly into a free standing unit:
It clips it onto the van.
This is how Supa Peg show the before and after:
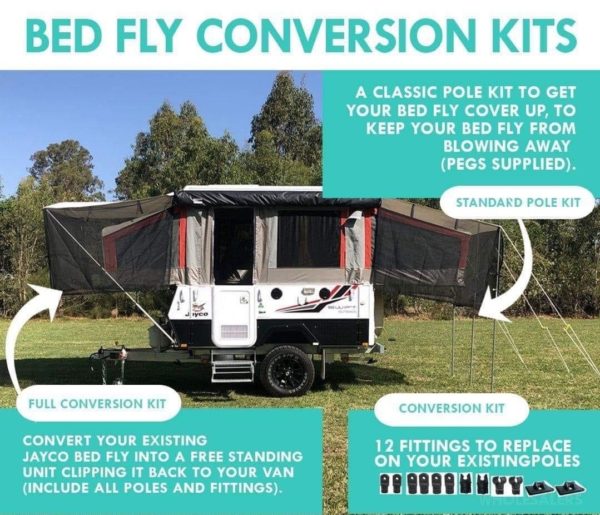
(click here to see these kits from Supa Peg on eBay)
This is what it looks like:
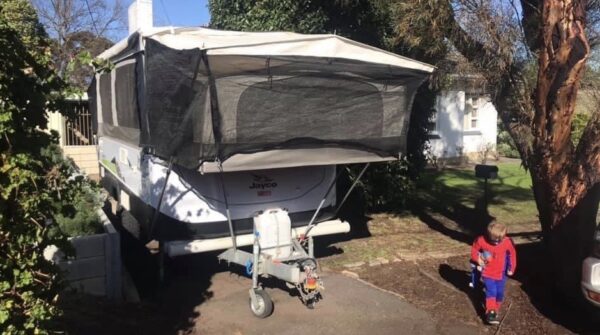
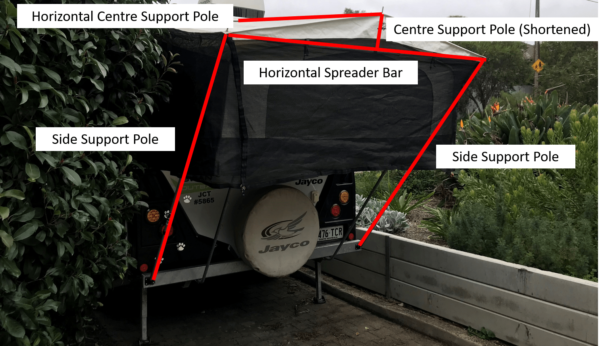
Here’s an outline of how the poles now sit on our van:
So what are the reasons for doing the bed end fly modification?
The main benefits I’ve noticed (so far) by doing this modification include:
Less poles. There’s no longer any poles touching the ground… and the centre vertical pole is now trimmed down to only be about 20 cm long
No guy ropes. Because they’re a pain. And kids love tripping over them.
Less things to carry. Less poles and no guy ropes equals less bulk and weight (more wine carrying capacity)
Better use of the area under the bed. Less poles means it’s easier to do things like the Clothesline Modification for Jayco Camper Trailer [Using Bed Support Poles] (click the link to read our ‘how-to’)
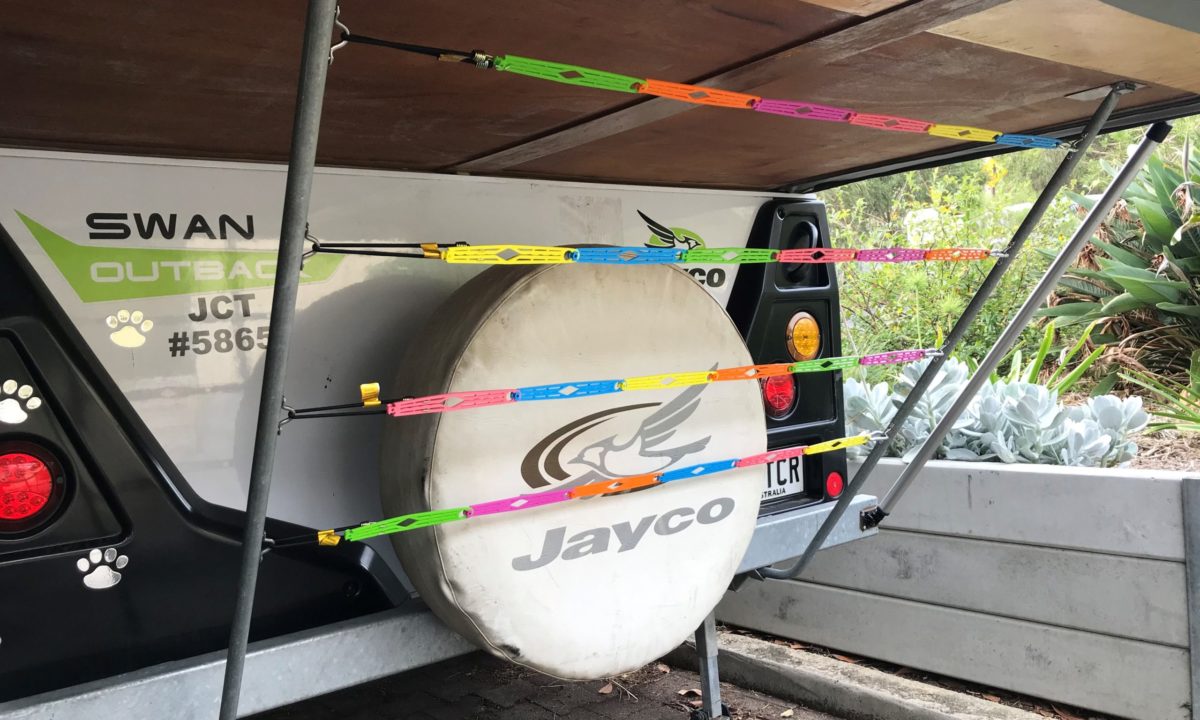
Easier shelter during set-up. If you’re trying to set-up during rain, then having the frame set-up with no messing around is awesome.
Quicker and easier to set-up. Clip and connect. No messing around adjusting rope or pole length. It’s WAY quicker.
On that last point:
The only poles that we now need to adjust for travel are the ones that go from the corner of the van to the corners of the fly
[the spreader pole that goes cross-ways is rolled up with the fly during storage, and the others are short enough to stay at their correct length in our pole carriers]
What about wind?
Our Swan is set-up all of the time in our driveway as our iso-office.
In this time:
- They’ve never popped off the poles, and
- The bottoms don’t flap around
[there’s eyelets at the bottom we put a clipgate through]
You still can put guy ropes on if it’s super windy and you feel the need…
…at least now it’s an option, not mandatory for every occasion.
What’s the cheapest and easiest way to do the bed end fly modification?
When we bought our Jayco Swan, the modification was partially done.
So I went to Bunnings and BCF to buy the parts individually to finish it off…
…and just one pair of connectors costs $10+ dollars!
So the best way to do it is to just get one of these Jayco Bed Conversion Kits from Supa Peg via eBay

(it comes with all of the 12 connectors you need for $30-$40 dollars)
It’s WAY cheaper than buying the parts individually!
Here’s the set up for our bed end fly modification:
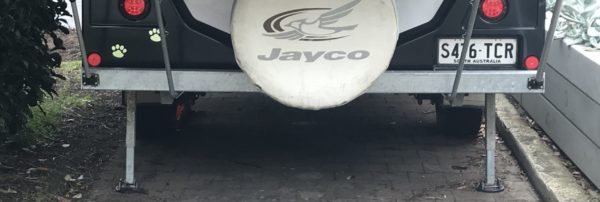
Here’s how the side support poles are attached to the back of our Jayco Swan with silicon and tech-screw:
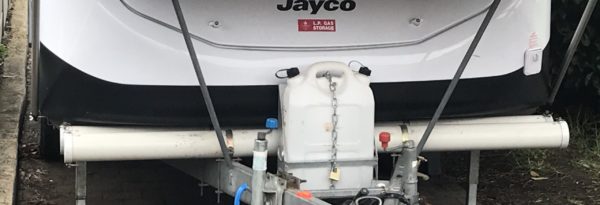
And the front using a bolt attached to the chassis (with wing-nuts on the bolt for securing the pole):
How is it attached at the front to the chassis?
At first we had a set-up using an M8 x 80mm bolt…
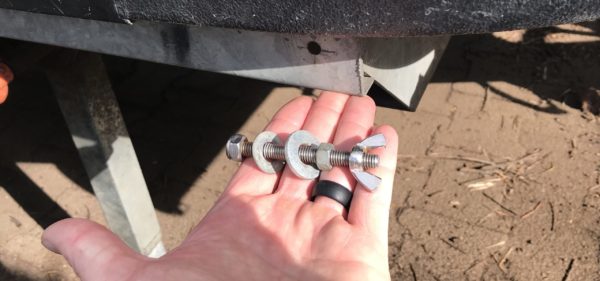
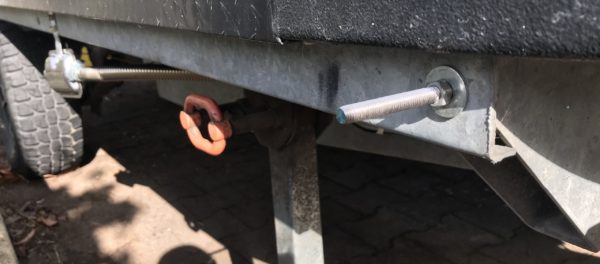
…which was great when the pole was attached, but stuck out a bit when not in use:
Full credit to a gentleman by the name of Steve Maybury because his better idea was to get:
- M8 x 35 mm bolts
- M8 couplers, and
- Wing Screws (M8 x 25 mm)
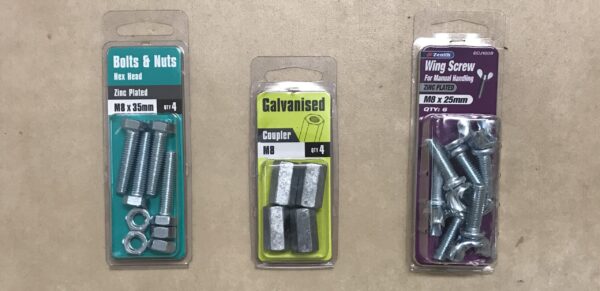
Using the same 8mm diameter hole, the shorter bolt comes through, with the M8 Couplers screwed over the top:
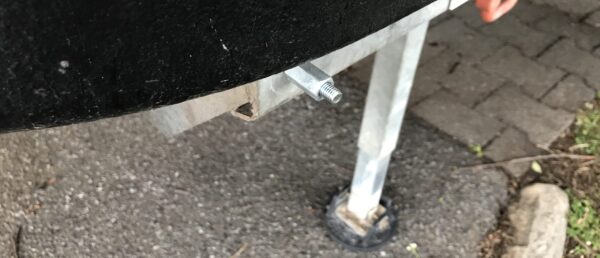
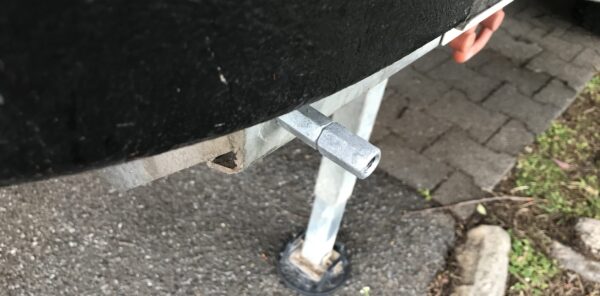
This makes a big difference because not only are they less sharp, but they only stick out a few mm:

When the pole from the Bed End Flys are attached it looks like this:
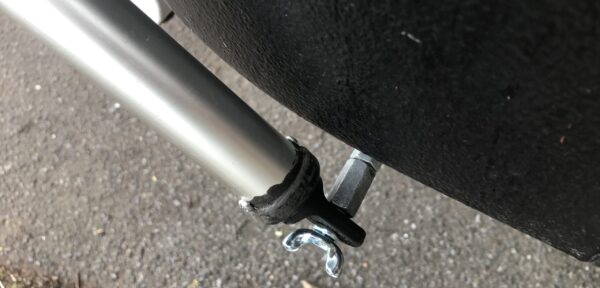
[the couplers create a spacer to keep the pole off the fibreglass hull]
In the end I actually opted to loctite the Wing Screw and one of the Couplers together (to screw onto the bolt as a unit):
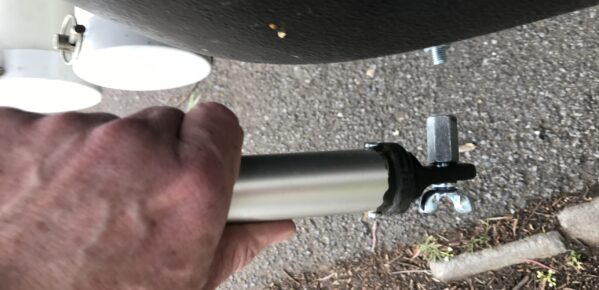
Now there’s no sticking out from the hull, no Wing Screw to misplace, and it still easily fits in our pole holder.
How do the horizontal centre support poles attach to the roof?
The horizontal rafters that come off the roof attach with a bracket that sits just under the bag for the bed end fly:
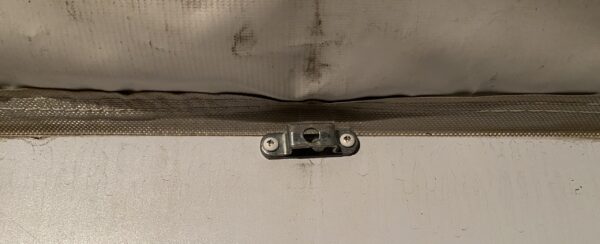
[If you don’t have any of these spare, they’re called ‘Jayco Bag Awning Rafter Mounting Brackets’ and they’re about $7 here on ebay]
I shortened the centre vertical pole using a hacksaw. This now joins the spreader bar to the horizontal centre support pole, and creates a little frame:

Internal view:
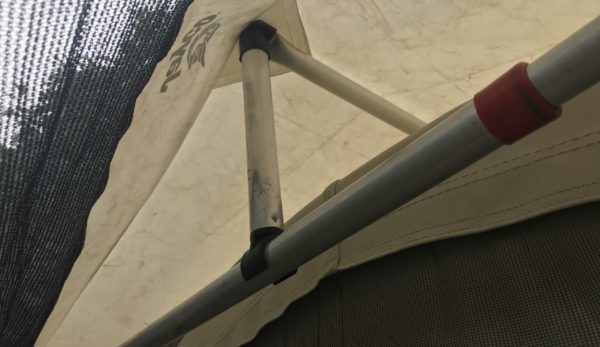
Here’s the side support poles fitting into the spreader bar in each top corner of the fly:
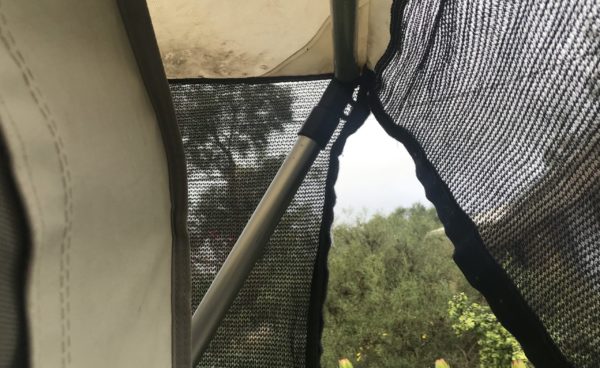
Summary: Jayco Swan bed end fly modification
There’s plenty of reasons why bed end flys should be part of your routine every time you launch your Jayco camper trailer… but they can be a pain.
This modification is totally worth doing:
It makes setting up and packing up easier. It’s less to carry. There’s less trip hazards.
The cheapest and easiest way to do it is to get one of Supa Peg’s Jayco Bed Fly Conversion Kit here on eBay…
…you can’t buy the individual parts cheaper!
Comment below if you have any questionsf… otherwise check out our article the 35 Most Popular Jayco Camper Trailer Modifications


Hi there, any chance you can show and explain in more detail how you attached the bolt and wing nut to the Chassis on the front end?
I have the same model swan OB and would like more info on how you did that, if possible please?
Hi Ed,
No problems – I took some photos, and just updated the post
Hope that helps!
Cheers,
Michael and Natalie
Hi Mike,
We are newish to the caravan/camper trailer world, we are enjoying your fantastic write ups and have made some of your cleaver installations. We have an old (2006 model) Jayco Hawk OB Camper Trailer which have the same bed end flys as yours, I believe ours doesn’t have the centre spreader pole. I think it will be a matter of buying the spreader pole and fit the attachment that comes in the Super Peg’s kit. Your thoughts would be appreciated.
Hi Orlando, thank you! That sounds about right, you can get the poles from BCF. Cheers!
Hi .. Thanks for a great blog for new comers .. I just bought a 2010 Jayco Swan Outback and would love to do this bed fly mod .. The swan came with only the 3 x Up right poles and one spreader pole .. It look like most people have a middle spreader pole coming off the roof back to the horizontal spreader pole .. Where would I connect the part to the roof and type of fittings needed extra .. hope this makes sense .Also bolt place meant on chassis what would the measurement be to drill hole for bolt Thanks
Hi Benny, thank you! Just updated the article – it’s an 8mm hole, and I’ve put a pic in there of the ‘Jayco Bag Awning Rafter Mounting Bracket’ that connects the middle spreader pole to the roof (I’d originally called it a horizontal centre support pole or rafter). Cheers!
Hi Man, this blog is awesome. Great work. Just wondering for the bed end fly set up, where or what measurements are the bolts situated on the chassis? Or do I just get it as close as I can see in the photos and just make sure it’s the same on the other side.
Cheers
Bill
Hi Bill, thank you! You’re right, no need for a specific measurement, just similar to what is in the photo and make sure it’s the same on the other side
Legend, Thank You. Great Blog mate. Keep them coming
Super helpful. Just finished doing my hawk 🙂 love the site.
Hi Michael and Natalie.
I built a similar set up for our bed flys but had no idea that the Supapeg kit existed. I, like you always set up our bed flys. If we are on the road and stop for an overnighter we sometimes dont use the poles but we always roll the flys out, and for all the reasons you listed above.
One of the best mods I have done was to fit a carbon water filter and pressure pump to our 2009 Sawn. I bought some John Guest fittings, some blue pipe and 10″ single filter. Takes the plastic taste from our water, stops bugs and stomach nasties that you can sometimes get from tank water. After use and when we store our Swan I take the cartridge out and put it in the freezer. Kills bugs and keeps the filter like new.
Hi Michael
Always find your blogs so helpful thank you.
I recently bought a bed end fly mod kit for my Swift. Can I do this mod with the camper packed down as I am unable to set it up at moment?
Thanks
Julie
Hi Julie, You sure can – the majority of the work is to the poles, and some attachments to the bumper/chassis
Hi Micheal,
My partner and I love your blog! We’ve used it as a bit of a guideline with setting up and modifying our newly acquired Hawk Outback!
We definitely plan on doing this modification but we need to get the actual bed flys first.
Do you have any suggestions on where to get them? Which brand? Jayco vs Supapeg?
Thanks!
Brian and Michelle
Hi Brian, for the bed end flys I’d recommend going the standard Jayco ones; they have a pitched roof which is better for rainfall, have a horizontal rafter which adds to stability, and the bed end fly modification from caravanmods is made specifically to suit these
Thank you for your reviews!
Also Do you think the waterproof bed end fly is a good upgrade from just the fly mesh walls of the flys? It’s so much extra to buy on ampsmart but is it worth it. Have you ever wished for a waterproof cover on the windows so your ends don’t get wet?
Thank you
Hey Sim, good question – I haven’t had any occassion where I wish we’d had the waterproof sides. We also use these when it’s hot too, so appreciate that the mesh still allows air to circulate too
I did this conversion on my old Jayco Finch and found that when setting up, the pole fouls the winder handle. So, you either have to get your companion to hold the pole up whilst you wind the top up or get a much longer winder handle. I have to go 600mm and that just clears the pole but still awkward to wind up. Those with electric winder or side winder obviously will not have a problem.
Hi Ian, I’ve since found out that different Jayco Camper Trailers (even within the same model!) have different winder lengths! Ours is long enough to avoid this, but an extension makes it even better