
Disclosure: When you click on links to various merchants on this site and make a purchase, this can result in this site earning a commission. Affiliate programs and affiliations include, but are not limited to, the eBay Partner Network
Here’s 23 tips for new Jayco camper trailer owners
(plus some answers to a few of the most frequently asked questions)
These are things that are specific to the operation of a windup camper trailer…
…and are things I wish I knew when we first got our Jayco Swan.
Here we go:
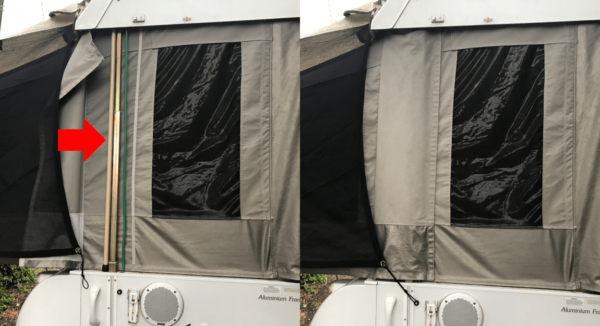
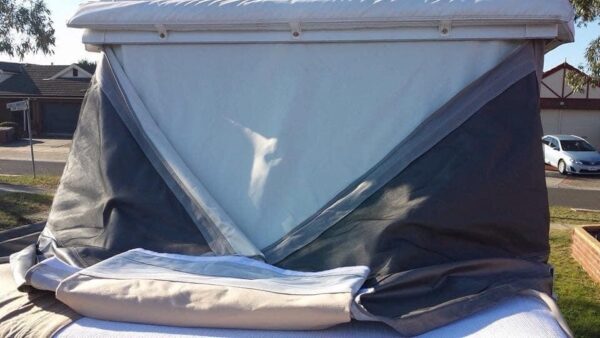
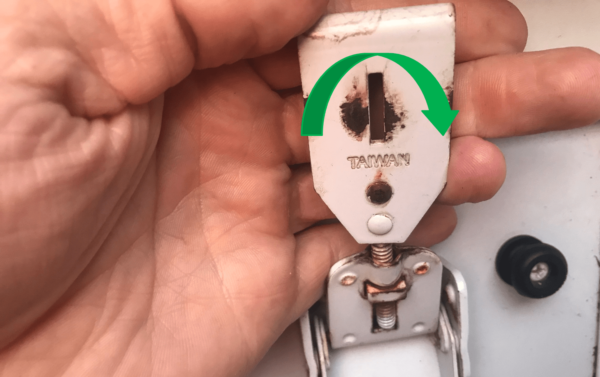
1. Hang the upper part of the door flat against the ceiling
How you hang the top part of the door makes a BIG difference when you wind down the roof of your camper.
This was a mistake we made:
If you leave the door hanging down at the entrance when you attach the little clips…
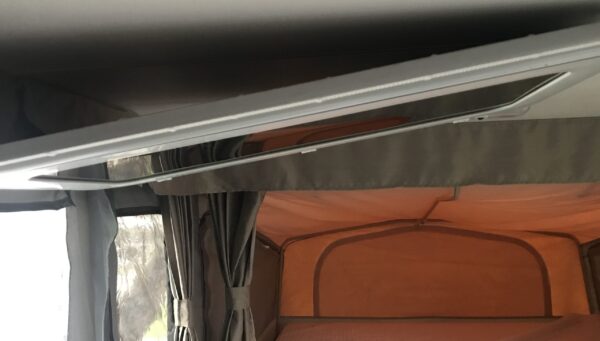
…then it can get in the way when you lower the roof.
This can make the lid hard to close, or even bend the clips.
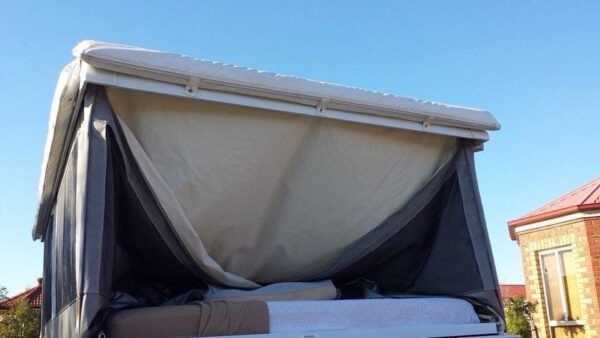
But if you push the metal plate up first?
The door folds flat to the roof:
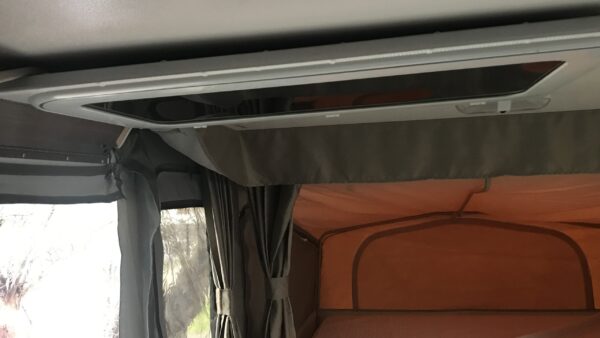
This makes the roof easier to close and gives more space for bedding
(and lets us keep our Ever Rest Memory Foam mattress topper on the bed when we pack down)
2. Check your roof safety switch if your lights aren’t working
A question that pops up nearly every day:
Why aren’t my Jayco camper’s lights working even though I have power everywhere else?
There’s a roof safety kill switch whose job is to cut power to the roof when it’s packed down
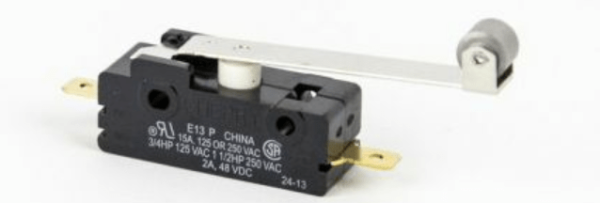
(so if the lights are accidentally left on they don’t melt the canvas or cause a fire)
The most common reason the lights aren’t working:
The switch often malfunctions because the metal lever gets caught and doesn’t let the white button drop down
So you might just need to check it here:
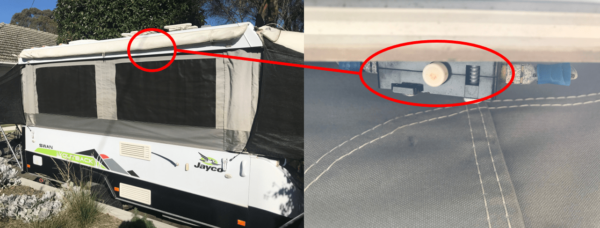
(on our Jayco Swan the metal lever has fallen off the switch at some point)
Believe it or not, cutting it out and simply joining the wires is one of the 35 Most Popular Jayco Camper Trailer Modifications
[because if you’ve turned off all the switches and/or disconnected the power before lowering the roof then there’s no power supply anyway]
Also, check that the 12 V plug near the sink is seated correctly too… and not corroded
3. Check the telescopic arms have lifted while you’re winding up the roof of your camper
Sometimes when you’re winding up the roof of your Jayco camper trailer the middle telescopic arm doesn’t slide freely.
This can cause one of the lifting arms to pop out and really ruin your holiday.
So when you’re winding up the roof of your camper it’s wise to stop half to three-quarters of the way and check the lifters
[It’s a step in our Jayco Camper Trailer Set-Up Checklist]
If the main outer sleeve looks like this:
Gently slide it up with your hand so it looks like this:
But… it’s important you find out WHY this is happening:
Unless the lifter arms are bent it’s usually that the arms need to be sprayed with some silicon spray
(or that the camper isn’t levelled properly)
HINT: The Velcro covers are there to keep your lifter arms clean and dry
[you’ll see what I mean in Number 6]
4. Cool down your 3-way fridge well before you need it
The 3-way fridge in a Jayco camper is pretty much designed to be run on:
- Gas when you’re free camping
- 12V from your car when you’re driving
- 240V when you have access to mains power
It takes about 24 hours for your fridge to cool down…
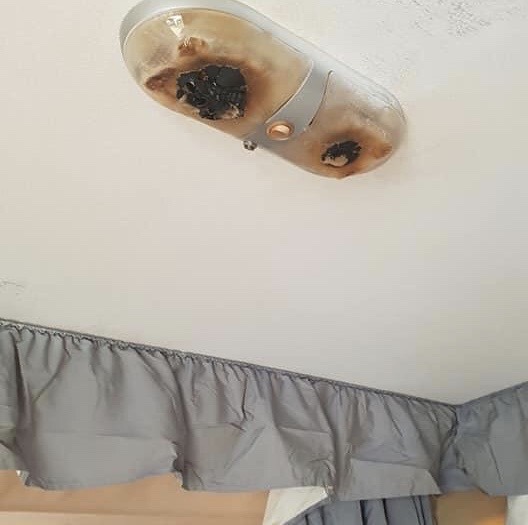
Should you run the fridge on 240V with the roof of a Jayco camper trailer wound down?
Some people have been doing it for years with no problem and say it depends on the van:
- If it’s an older model that has venting in the top of the bench then ‘no’
- If it’s vented outside then it’s fine
But… even on our 2014 Jayco Swan OB (vented outside) it still has this warning:
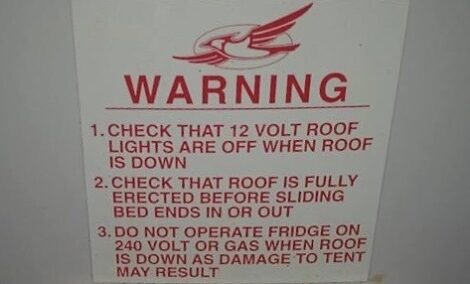
This might be some good ol’ fashion butt covering…
…but then there’s this Jayco Penguin that was for sale for parts:

Maybe it would have happened anyway even if the roof was up?
Anyway… to make sure you can keep your camping supplies cool when you reach your destination a couple of options are:
- Put some pre-frozen bottles of water in the fridge to cool it down while you’re travelling (and take things in an esky), or
- Plug your camper into 240V a day or two before you travel
(we don’t have a 15A power point installed so we got one of these Ampfibian 15A to 10A adaptors from eBay)
If I can’t set up our Jayco Swan before travelling, I’ll stick with the first option
Want to learn more about getting the most out of your 3-way fridge?
Read: 3-Way Fridge: Jayco Camper Trailer Hints, Tips and FAQs
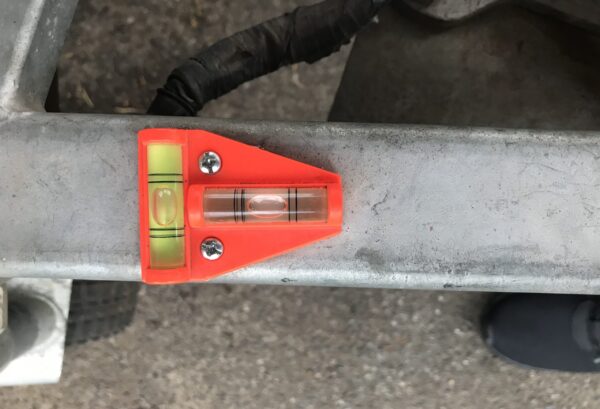
5. Always make sure your camper is level before you set up
There was this one time (before I fixed a T-spirit level to our drawbar) that I set up our Jayco Swan and it wasn’t level:
The door wouldn’t shut properly.
Water pooled on the sink.
But the big one?
The roof was noticeably leaning to one side
(the whole time I was worrying that it would bend the telescopic lifter arms)
And… not having a 3-way fridge level can stop it from working properly.
Sticking a T-spirit level on the drawbar is the best $5 you’ll ever spend on your camper
(another entry on the list of the 35 Most Popular Jayco Camper Trailer Modifications)
HINT: Don’t stick it straight on there… just because your drawbar is level, doesn’t mean your bench or sink will be too
Check out: How To Fix A T-Spirit Level To Your Caravan or Camper Drawbar [5 Steps]
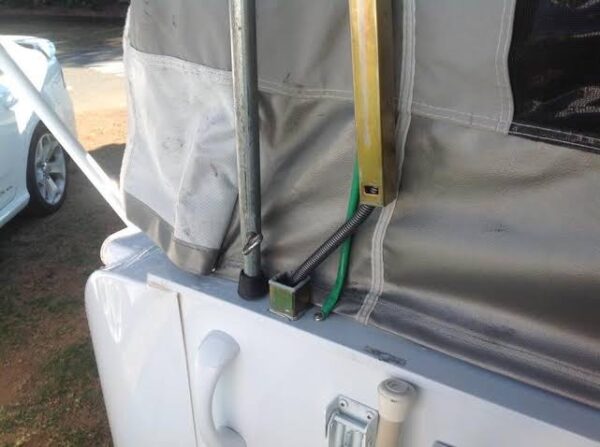
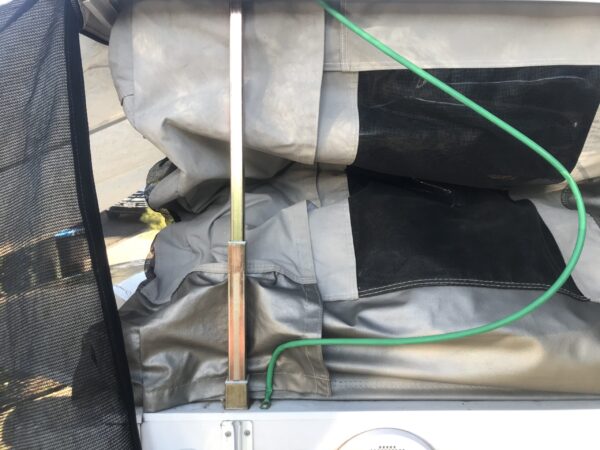
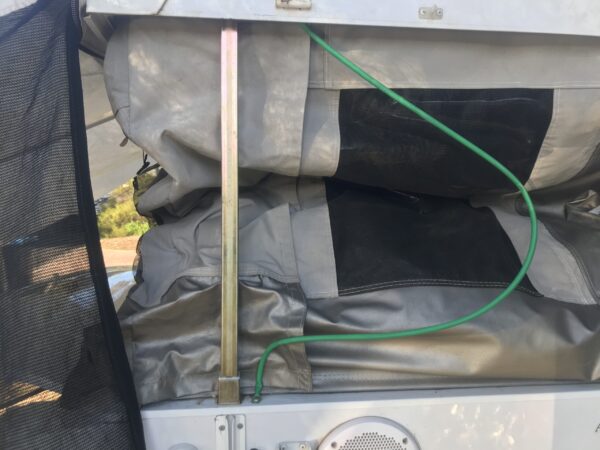
6. Use roof support poles (but as backups only)
A pair of roof support poles now come as standard when you buy a Jayco camper trailer:
They’re like 1200 mm insurance policies in case your roof collapses.
If your camper didn’t come with (at least) 2 of these then grab a pair for the corners opposite to the door and wardrobe
But remember:
There’s no designated weight-bearing area in the roof for these poles. They’re a fail-safe only. Don’t take tension off the lifting arms and rest the roof on the poles.
Ours came with 4 and take less than a minute to put in
(I do it while I’m checking the sleeves are fully up and when I’m closing the Velcro).
You can get them yourselves with some aluminium poles and rubber stoppers from Bunnings.
But to be honest?
By the time you’ve bought all of that it’d be just as cheap to buy them from your local Jayco store
[they’re about $12.50 each]
Fun fact:
I scrounged the Internet and could only find one single example of the roof collapsing once it’s up. Collapses seem to occur during set-up…
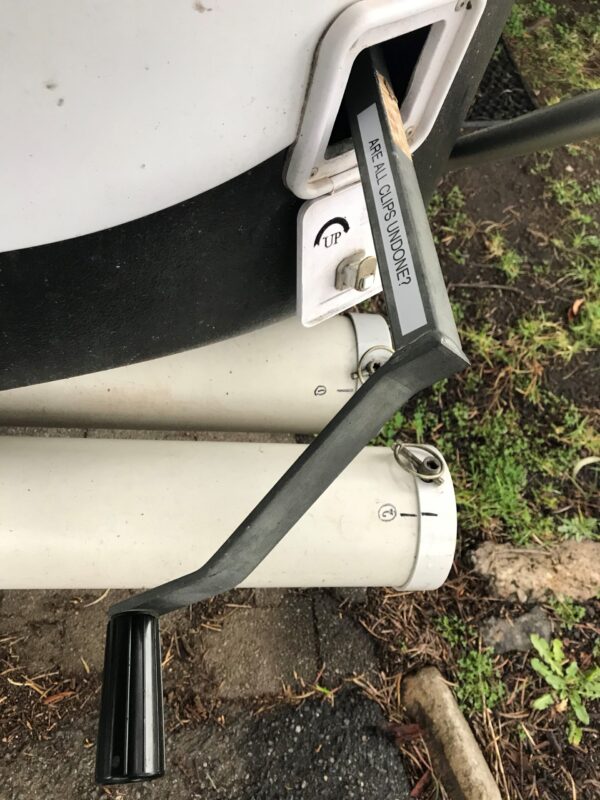
7. Double check that the roof clips are undone before you start winding up the roof of your camper
One of the most common causes of cable failure is forgetting to undo one of the catches and starting to wind up the roof.
Even if it doesn’t fail now, it can start to open up the eye bolts that hold the cable
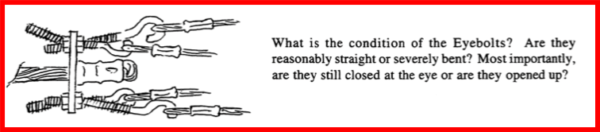
(they’re an engineered weak point)
I’ve given myself this gentle reminder:
8. Keep slack off the cables when the roof is down
When you’re winding down the roof of a Jayco camper it’ll usually stop a couple of centimetres off being completely closed.
Resist the temptation to keep unwinding because the cables will get slack in them
(and may not spool properly when you go to wind it up again)
Use the clips to close the roof… and give the handle a GENTLE turn to take any slack off the cable
9. Do the bed end fly mod (so you’ll use them more often)
I thought the bed and flys would be something I’d only use in bad weather.
But I’ve since come across some reasons to use them (nearly) every time I set up.
There’s probably more, but here’s…
9 reasons to use bed end flys on your Jayco camper trailer:
- They keep your van a bit darker in the mornings (important with small kids!)
- Creates more privacy if your windows are open
- Stops condensation landing directly on your bed ends on cold and damp nights
- Keeps your bedding dry during pack up
- You can stand under them to keep your bed dry while you’re setting up
- Keeps the sun off the bed ends to keep them cooler
- They create an air gap for extra insulation
- Stops rain from landing and pooling on your bed ends
- No folding bird poo into your bedding!
Our Jayco Swan came with these CampSmart ones
(we love them)
Sure, they’re one extra thing to do during set-up and pack-up, but they’re worth it.
Want to make the bed end flys quicker to set-up, with less poles, and less guy ropes to trip over?
Then check out the bed fly conversion kit from SupaPeg via eBay
(about $40 and one kit does both ends)
Read: Bed End Fly Modification For Jayco Swan Camper Trailer (Our Review)
10. Insert the hockey sticks before doing up the Velcro on your bed ends
If you fasten the Velcro on your bed ends before inserting the the hockey sticks, then this:
- Makes it harder than it needs to be, and
- Can snap off the round bit on the Plastic Bed Saddles
(we carry spares a couple of spares, they’re about $7 here on eBay)
Our set-up routine is pull out the beds, go inside to insert the hockey stick, then go back out to do up the Velcro.
11. Create a checklist of things to do before you lower the roof
There’s some things that are a pain in the bum if you forget to do before you lower the roof.
If you forget to switch the fridge over it won’t work while you’re driving.
Or worse:
If you forget to turn off the lights it can cause a fire.
Full credit to the person we bought our Swan from…. they made this handy laminated list for the inside of our door:
- TV antenna
- Light plug
- Fridge
- Battery switch
- Door
- All power switches
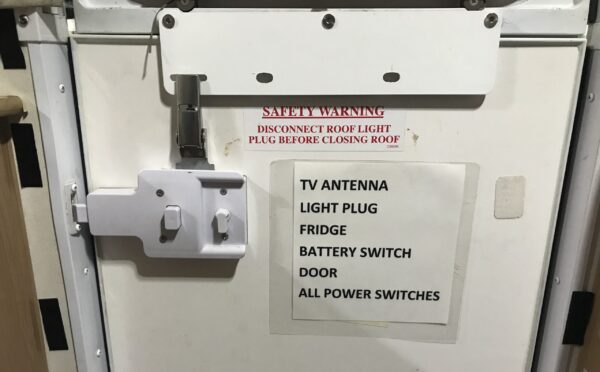
(I was surprised that ‘door’ was on this list… until one day I went to wind down the roof without doing it too!)
For our full list, read: Our Jayco Camper Trailer Set-Up Checklist
12. Lubrication is your friend
Unlike a caravan, a Jayco camper trailer has a lot of moving parts…
…so it’s important you keep things well lubricated to reduce wear, tear, and effort.
A can of this stuff is less than $10 from Bunnings:
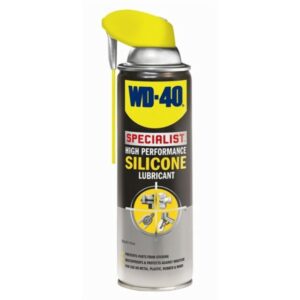
The first time I used it I noticed a massive difference in:
- Opening and closing the zips on the bed and flys
- Sliding the beds in and out
- Letting the sleeves on the telescopic lifter arms move more freely
HINT: Hold a piece of cardboard behind the lifter arms when you spray so you don’t stain the canvas
13. Keep your canvas as dry as possible
Anyone who’s owned a camper trailer before knows that you should:
- Try to let your camper dry out as much as possible before packing up
- If you have to pack up when it’s wet, set it up at home and let it dry out
- Open it up regularly to make sure there’s no moisture trapped inside
(it’s easy to kill mould, but removing mould stains is another story)
One of the things about a Jayco camper trailer is that there’s still air circulating even when it is closed down.
Moisture absorbers are only a couple of dollars…

…get them from hardware stores, cheap shops, and most supermarkets
(you’ll be surprised how quick they fill up)
14. Turn the battery switch on when you’re on 240V to charge your battery properly
Your battery will not charge properly if you’re plugged into 240V and the battery switch is off.
Depending on the model of Setec charger that’s in your Jayco camper leaving the switch off will either give:
- Trickle charge at 0.8A, or
- No power at all
If you have access to 240V… both Setec Series II and Series III manuals say the same thing:

Turning it on allows it to use its 4 modes:
- Boost
- Float
- Store, and
- Trickle

This extends the battery life. During store mode, the unit exits to boost mode for 15 minutes every 24hrs to maintain charge in the battery.
And if you can’t (or don’t want to) leave it plugged in?

Leave the power supply on for at least 2 – 5 days with battery connected
NOTE: If you’ve got something different to a Setec charger (like a BMPro) then turning off the switch may have no impact on the charger
15. Fold the canvas flat to make it easier to close your roof
If the canvas is all bunched up on the mattresses then:
- It creates more bulk, and
- Air pockets can get trapped
[this can make the difference between keeping your bed made or leaving a mattress topper in place]
To get things as flat as possible the method that works for us is to:
- Push the rear bed in first
- Go inside to pull the rear canvas flat
- Fold the front canvas using the “envelope” method
How to fold up a Jayco camper trailer bed canvas like an envelope:
- Fold the corners of the canvas into the middle of the bed
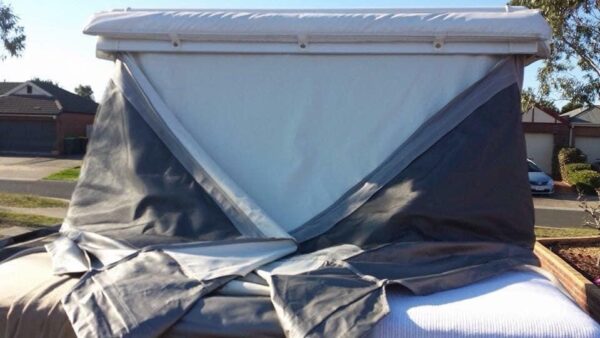
- Fold the long edge of the canvas back into the middle
- Push the bed in slowly, neatening it up as you go
I’m not even sure where these pics came from (they’ve been shared by so many people)…
…but whoever took these photos is a legend!
When you’re packing down, don’t forget…
16. Remove rings and use the back of your hands when pushing in the canvas
Anyone who’s wound down the roof of a Jayco camper trailer knows that you need to stop a few times to go around pushing in the canvas.
But something that some people have learned the hard way?
Fingers can poke holes in the fly screens, and diamond rings can get caught
[especially as the fly screens get older]
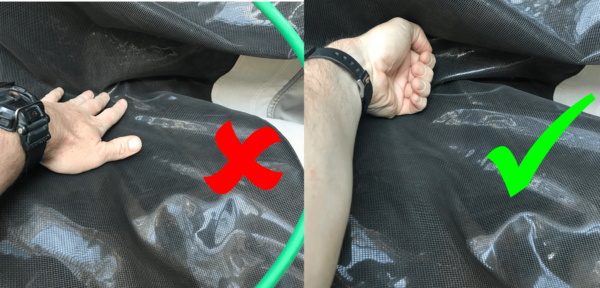
So a big tip is remove jewellery and use the back of your hand to push in the canvas so that you don’t accidentally stick your fingers through the flyscreens.
17. Don’t worry about the ‘clunk’ noise when you’re about half way through winding up the roof
I was skeptical when I was told this at handover:
“Don’t worry about it, it’s normal, it’s always done it”
I wasn’t convinced because there was no REASON given…
…but it’s a question that gets asked all the time.
It turns out that it is normal for a wind up camper system, which winds a cable around a winch drum:
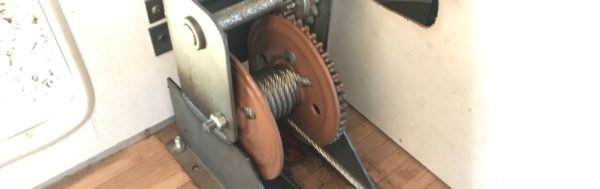
The cable slips on itself as the first layer is complete and it’s starting a new layer
(TIP: I use it as my cue to go around and check that the telescopic arms have lifted)
18. Adjust your roof clips so that they don’t come loose while you’re driving
You can adjust how loose or tight the roof clips are by twisting them
(they have a nut and bolt built into them)
So any time you go to clip down your roof and it feels a little loose, it’s worth adjusting them so they’re snug.
I’m sure you don’t come loose often, but if they do, once is enough!
19. Don’t plan on your power points working if you’re not connected to mains power (unless you have an inverter or generator)
A simple way of looking at things is that you’ve got 2 separate electrical circuits in your camper:
- Your battery powers a 12V system
- Your power points run off a separate 240V circuit
So if you’re not plugged into mains power, your 240V power points won’t be live
(this includes USB chargers if they’re part of a 240V power point)
Read: Pop Up Power Point for Jayco Swan (Installation and Review)
So if you’re free camping plan on cooking on gas…and buy 12V appliances where you can.
If you insist on using 240V appliances, you could:
- Get an inverter (but you’ll more than likely chew through your battery really quickly), or
- Run a generator (but be prepared to lose a few friends)
20. Make sure you have the right 15A gear to plug your camper into 10A mains power
The electrical system in your Jayco camper trailer is rated to draw up to 15 amps of current at once…
…while your home runs on a 10A power supply.
So to start with, you need a heavy duty extension cord that’s rated to 15 amps

(which won’t fit into a standard power point).
Then you have 2 options:
- Get a qualified electrician to install a 15A power point to plug into, or
- Purchase an approved 15A to 10A adaptor (which is handy for travel anyway)
And no:
Changing the head of the power lead to a 10A one or grinding the earth plug down to size are not options.
The most popular and best option is an ampfibian adaptor. You can get them at Bunnings, but we bought ours a bit cheaper here off eBay.
21. If you’re using an awning make sure you have a way to even out the tension on the other side
When you put up an awning (or annex) it can pull the roof sideways.
This can:
- Put a bending force on the lifting arms
- Stop the door frame from being in alignment
One option is to replace the lifting arm bolts with eye bolts to create a spot to connect guy ropes…
…but another option is a kitchen awning privacy sunscreen:
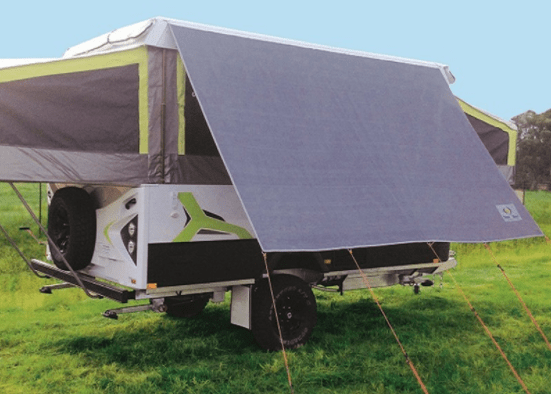
[get them here from eBay… perfect for keeping the sun off the fridge in summer]
22. Protect the 12V plug that’s near the sink from water with some plastic tubing and a chopping board
<insert your favourite joke here about this amazing Jayco camper trailer design feature>
Protecting the 12V socket from water is important for obvious reasons.
A culprit seems to be when you connect to mains and first turn on the tap:
Water can come blasting out!
Some tips that a few people have done to help this include:
- Attaching some 8mm tubing (Bunnings) to increase the length of the tap
- Placing a chopping board behind the tap and in front of the 12V plug
23. Know how water affects your weights
Here’s a couple of important numbers to know:
300 kg is the standard load carrying limit for a Jayco camper trailer
And:
You’re carrying 82 kg of water when you fill the standard 82 L capacity tank
So it’s worth keeping those numbers in mind when you’re wondering whether you should travel with your water tanks full…
…especially when you consider that the 300 kg limit includes your awning, aircon, solar, etc
[there’s no straight answer about how water will affect your tow ball weight because it’ll differ depending on where tanks are relative to your axles]
Summary: Tips for Jayco camper trailer owners
I’m sure this is just scratching the surface of tips for Jayco camper trailer owners
…but these are the ones that jumped out at me as important to know
(and I only learned most of them AFTER we started using our Jayco Swan)
You might also like: 7 Tips to Keep Your Jayco Camper Trailer Warmer in Winter
Otherwise, check out our most popular article:…
Read: 35 Most Popular Jayco Camper Trailer Modifications
Or one of our more recent articles…
Read: 9 Tips To Save Time Setting Up Your Jayco Camper Trailer
![The Best Roll Out Awning for Jayco Camper Trailers [3 Options]](https://abigpeacheyadventure.com.au/wp-content/uploads/2020/05/The-Best-Roll-Out-Awning-for-Jayco-Camper-Trailers-3-Options-440x264.png)
![Caravan Fridge Internal Fan Installation: Jayco Swan [Thetford 3-Way]](https://abigpeacheyadventure.com.au/wp-content/uploads/2020/12/Klevakool-Caravan-Internal-Fridge-Fan-Kit-in-Jayco-Swan-Camper-Trailer-Thetford-3-Way-Fridge-440x264.jpg)
![Jayco Camper Trailer Checklists [Set-Up and Pack-Up]](https://abigpeacheyadventure.com.au/wp-content/uploads/2022/11/Jayco-Camper-Trailer-Checklists-Set-Up-and-Pack-Up-440x264.png)
Awesome list. Keep them coming!
Thanks Caleb… If you think of anything that’s not on here, please let us know!
What a great list and so many great ideas. My swan is 8yrs old and I noticed the winder has been getting more difficult on a recent trip. Guess what fraying Amin 5mm cable. Your pages, ideas and links will help me fix it myself. Love the diesel heater install as well. And I really like that you have included the links on where to obtain the various bits and pieces. Thanks
Hi Peter, thanks for your kind words! If you have any things you’d like a hand with or need more detail on, more than happy to help
These are all great. Thanks so much! Never thought about the balance of the roof when annex is only out.
We bought our Hawk in July and have already managed 8 different destinations in Vic. We love it!
G’day everyone, I am new to the carvaning scene. I am enjoying reading and getting tips when setting up our van. We have just purchased a 2014 Jayco hawk outback. As a novice to owning a caravan I gradually getting ideas on how to make things a easier, like we have just installed a jackajay lift system and fitted a fiaama s45 awning also a cruisemaster 35 hitch and other handy items like a ampfibian caravan power adaptor. Looking forward to our first adventure soon.
Thank you for sharing your tips, advice and comments