Disclosure: When you click on links to various merchants on this site and make a purchase, this can result in this site earning a commission. Affiliate programs and affiliations include, but are not limited to, the eBay Partner Network
Here’s 23 things to look for if you’re buying a Jayco camper trailer.
We’ll focus on covering the most common things that need repair or replacement after purchasing a wind-up camper…
…but will also add in the standard things to look for whether you’re looking at a camper, pop top or full sized van
(this way if you can’t get a professional inspection done, you’ve got a bit of checklist)
There’s a bit of a guide for the price of repair or replacement too:
This way you can see what’s too costly to fix based on the proposed sale price
(or it can give you some bargaining power)
Here we go:
1. Make sure there’s no rust or damage to the chassis
This one isn’t a specific thing to look for just when you’re buying a Jayco camper trailer, but I thought it should go first:
It’s safe to say that this is only definite go/no-go thing on this list
[the very first thing I did when we bought our Jayco Swan was climb underneath it]
Everything else is a matter of weighing up the time, cost, and your negations skills.
But if the chassis is damaged, cracked, or rusted?
Walk away.
2. Check the canvas doesn’t need replacing
The first thing to check (that’s specific to a Jayco camper trailer) is the canvas:
A few small holes can be patched.
But if it’s really mouldy or worn with lots of holes and tears?
A canvas can be the single most expensive thing to replace on a Jayco camper trailer
(more than replacing the entire roof)
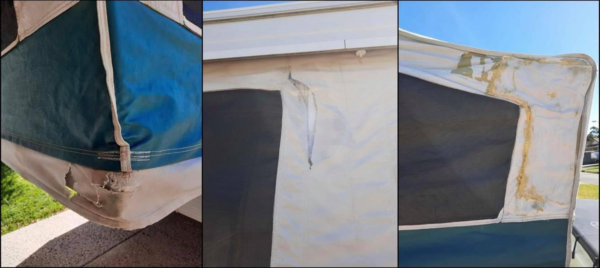
If you’re lucky you can get a replacement direct from Jayco for $2,000 plus shipping…
…but if they don’t have that year’s model in stock then getting a new one made and fitted can be anywhere $2,500-$5,000
[you might be able to save some dollars if you shop around and spend a few hours fitting it yourself]
While you’re at it:
Check that Velcro under the bed ends creates a strong bond because this will cost a $100-$200 to replace too
3. Check for signs of roof leaks
One of the most common faults in a Jayco camper trailer is a leaking roof
(especially the older ones that are made from two pieces)
If they’ve been regularly re-sealed (or a leak has been immediately fixed) then everything should be fine.
If the silicone has started to deteriorate then it could be:
- Around $600-$700 to have it resealed, or
- About $50 of sealant from Bunnings, some safety razors, turps, a few hours’ work, and a lot of patience
But if the roof needs replacement?
A new roof (if you can find one) can cost $3,000-$3,500.
Some tell-tale signs and places to look for water damage include:
- Roof is no longer flat and is sagging
- There’s dodgy silicon around the roof (especially around the corner mouldings)
- Paint is cracking on the ceiling near the join
- Watermarks on the ceiling, behind the curtains, in cupboards, under the bed, or in the wood under the lounge seats
- Mattresses have stains (unless they’re the kid related ones!)
- Freshly painted areas could be covering up previous damage
Tip: Set it up in the driveway and wash it ASAP so you can check for wet spots (better to find out now than when you’re out camping)
4. Make sure the flyscreens aren’t brittle or don’t have too many holes
There’s a lot of flyscreen in a Jayco camper trailer…
…and they experience a lot of wear-and-tear because of the setting-up and packing-up process.
A small hole or two can be easily fixed with some heat-activated Screenmend patches
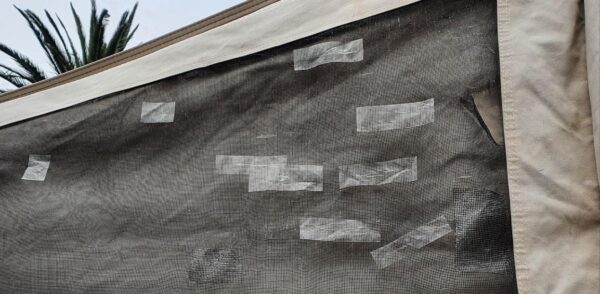
But if the flyscreens are brittle or riddled with holes?
The average cost to replace the flyscreen is $100 per window.
The price varies quite a bit though, and some places charge as much as $400 to remove and refit the canvas:
Replacing the flyscreens for the whole camper can vary anywhere between $500 to $1,700
[which may only be a little less than getting the whole canvas replaced]
The good news with flyscreen is that (unlike the canvas) you can do it DIY if you’re handy.
The $50 DIY Jayco camper trailer flyscreen replacement:
- A roll of flyscreen from Bunnings
- Half a day
- A soldering iron
- This YouTube video
5. Make sure the 3-way fridge runs on 240V, Gas, and 12V
If the fridge doesn’t work a new one will cost around $1,500.
So if you have the chance:
Ask the seller to turn it onto 240V a day before you inspect your potential Jayco camper
(that’s how long 3-way fridges can take to get cold)
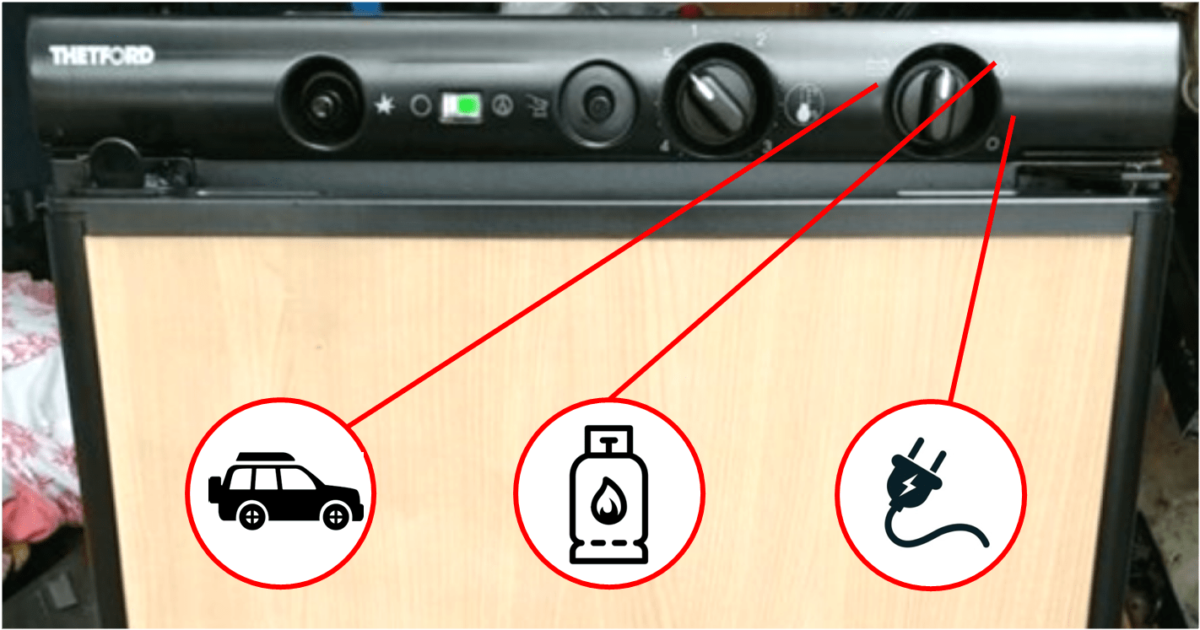
Then check to make sure it’ll light on gas.
To make sure it works on 12V in most cases you’ll need to hook up the camper to a tow vehicle
(3-way fridges aren’t wired to the camper’s battery unless it’s been modified)
Read: 3-Way Fridge: Jayco Camper Trailer Hints, Tips and FAQs
6. Look for cracks in the roof corner caps
If the roof corner caps are cracked there’s no point trying to seal them, they need to be replaced:
Depending on the year a cap will cost $70-$100 each
And then there’s the labour.
They break if you try to take them off so they need to be smashed out in little bits, the silicone cleaned off, then the new ones put on with heaps of sealant
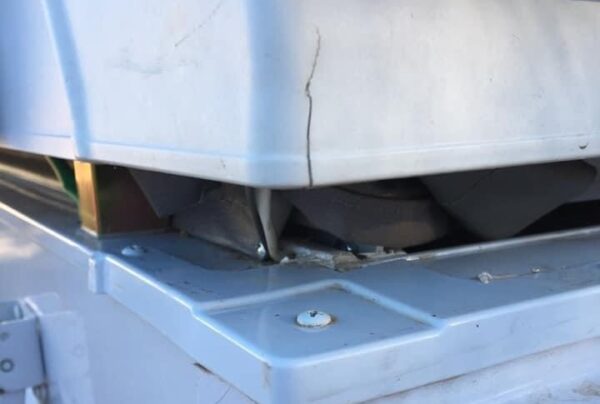
(if you’re not handy you might be looking at around $1,000 for all corners)
7. Make sure the roof winds up and down easily AND inspect the winch system
During inspection ask the seller to raise the roof and set up the door 3-5 times:
This will help you learn the correct sequence AND you’ll see if there’s any problems
[don’t be alarmed by the ‘clunk’ as the roof’s being wound up… it’s normal as the cable spools onto the winch drum]
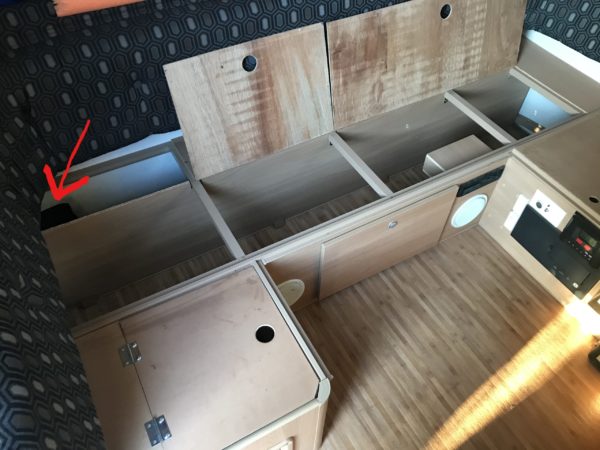
There’s only a few screws that need to be removed to check out the winch system. A few things to check include:
- The winch is firmly fixed to the floor
- Eye bolts aren’t stretching open, and
- There’s no frayed cables

If the cables need to be replaced, you’d be looking at around:
- $200-$300 for the main cable
- $500-$1,000 for all 4 corner cables
If you’re handy and keen to give it a go, then it’s a lot cheaper:
- A set of 4 corner cables will cost around $120 from Jayco
- You can fix a broken main cable for less than $20 with parts from Bunnings
If you want to see what’s involved here’s how we fixed a snapped cable in our Jayco Swan:
Read: How To Fix A Jayco Wind Up Lift System (Broken Main Cable)
While your checking the cable system…
8. Check that the lifter arms aren’t bent
If the roof doesn’t go up and down easily then one of the causes could be bent lifter arms.
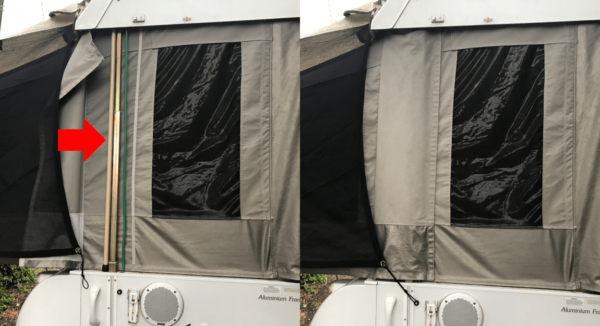
The good thing is that these aren’t that expensive to replace:
Around $80 each to buy the part and DIY, or around $150 each if you get someone else to do it for you.
9. Make sure the underside of the mattress hasn’t gone mouldy
A common occurrence in Jayco camper trailers is that the underside of the mattress gets damp with condensation.
Then, if the camper is packed up before it’s aired out, the underside of the mattress gets mouldy.
Now, many people don’t like the idea of having a mattress that others have slept on and plan on replacing anyway…
…but if that’s not you, you might need to budget $100-$200 for a new mattress anyway.
10. Check the tyres are less than 5 years old (including the spare)
Rubber deteriorates over time so most manufactures recommended replacing tyres once they’re over 6 years old
(this is regardless of appearance, wear and tear, or how many kilometres they’ve done)
Safety issues aside, if you get a puncture and they’re older than this then some tyre repair centres will refuse to work on it.
If the tyres are over 10 years old then they definitely need to be replaced…
…but if they’re anything over 5 years old you need to budget around $600 for a set of 3 new tyres.
To find out when the tyres were manufactured find the ‘DOT’ stamp and look at the last 4 numbers:
The first 2 numbers represent the week, and the last 2 numbers the year
For example:
2319 means the tyres were made in the 23rd week of 2019
11. Check the zippers on the awning bag and bed end flys don’t need replacing
Sure, check the awning and bed end flys for holes…
…but what seems to be more common is the zippers perishing on their bags
These aren’t an easy DIY fix:
You’d be looking at around $100 per bed end fly bag (and more like $150 for the awning bag) at a canvas repair place.
12. Check that the battery is less than 6 years old (and fully charged)
It’ll cost $250-$300 if you have to replace a half-decent 100 Ah deep cycle battery.
The typical AGM deep cycle battery will last up to 6 years IF it’s been well maintained…
…so if the battery is close to this aged, budget on a replacement.
Also, check the screen of the charger (or use a multi-meter) to make sure it’s at least 12.7 V.
13. Make sure the beds easily slide in and out
The beds should slide in and out pretty easily.
If they don’t, it might just mean they need a little lubrication…
…but check that the bed tracks aren’t pulling out of the walls OR the tracks aren’t bent.
If the bed tracks do need replacement they’re about $40 each.
It’s a pretty simple 5 minute replacement job with a spanner and socket set:
- Bed supports in
- Replace one at a time.
- There’s 4 bolts (and the bolt that stops the rail extending too far
[just remember…always put the bed support poles in the moment you slide the beds out!]
14. Check that the door hinges aren’t pulling through the trim
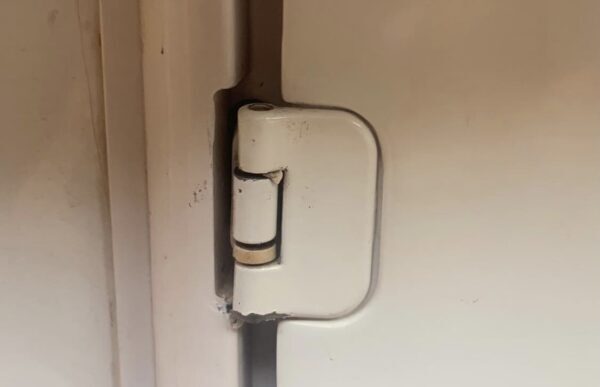
The way that the door hinges are fitted in a Jayco camper trailer is a peculiar design:
They’re screwed in from behind the door trim
The problem with this is:
- The screw heads are easily pulled through the trim because it’s thin plastic, and
- If this happens, to fix it you need to take off the lower section of the door and trim
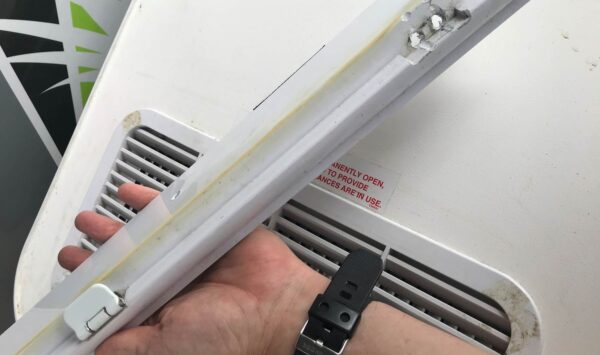
[quite often it’s a job that doesn’t require parts, just the time and effort to remove it all, put in a backing plate, and re-seal]
This is something that happened in our Jayco Swan while we were camping… fixed it in about an hour
15. If the axle has been underslung make sure that it’s been done properly
The axle on a Jayco camper trailer normally sits above the leaf springs.
A common modification (especially on Tourer models) is to under-sling the axle so that it sits under the leaf springs
(this creates some extra clearance height)
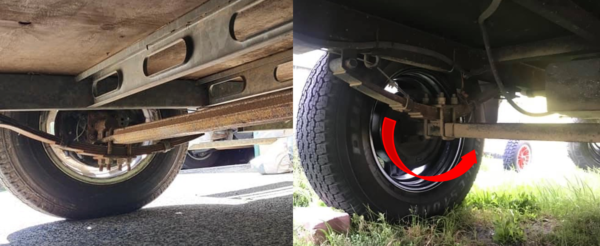
Sometimes this has been done incorrectly though:
The axle shouldn’t be flipped or rotated
So if the camper you’re looking at has been underslung, ask some questions about who did it
Now that the most common ‘post purchase costs’ related to buying a Jayco camper trailer are out of the way, now let’s look at some more general things:
16. Make sure the stovetop works on both gas and 240 V
In most caravan cooktops there’s usually 3 gas burners and one electric hotplate
(this won’t work on battery because it draws too much current, so check when it’s connected to mains power)
17. Test that all lights and power-points are working
If the camper has a battery, first check the 12 V system by testing:
- All lights (inside and outside), and
- Any 12 V outlets (sockets and USB)
Then, connect the camper to mains power and check the 240 V system by checking:
- All lights still work, and
- All power-points work
Remember:
The power-points will only work when you’re connected to 240 V mains power unless an inverter is installed
18. Make sure there’s no cracks in the spare wheel holder on the bumper
Attaching bike racks to the spare wheel on the rear bumper is quite common.
This can put a lot of extra stress on the welds though:
It’s a combination of an extra 20-30 kg, the load being further away, and the bouncing along the highway.
19. Test that the stabiliser legs wind down smoothly (and aren’t bent)
It’s surprising how often stabiliser legs get bent or broken:
Some people use them as levelling devices rather than stabiliser legs.
Not hard to replace, but at around $100 a leg it’s something you don’t want to have to replace if you can avoid it.
20. Check that it has a jack and wheel brace
If these are missing, it’s just another thing you’ll need to budget for.
21. Check the service history (especially brakes and wheel bearings)
Getting a Jayco camper trailer serviced means different things depending on where you go.
Key things to ask though include:
- When were the brakes checked?
- How long ago were the wheel bearings done?
(ideally they should be checked and re-greased every 10,000 kms or 12 months)
22. Make sure it has all required roadworthy, safety, and compliance certificates
Different states have different requirements regarding roadworthy and compliance certificates.
Rather than try to list them all here, check these links for your state:
ACT: Motor vehicle registration transfer
NSW: Apply to register a camper trailer or caravan
NT: Buying and selling a used vehicle: registration
QLD: Safety certificates
SA: Transfer vehicle registration
TAS: Buying, selling or transferring
VIC: Transfer a trailer or caravan
WA: License a caravan or camper trailer
23. Conduct a PPSR (aka REVS) check
Check that the camper you’re looking at is registered in the seller’s name.
Then, using the Vehicle Identification Number (VIN), for $25 on this website you can get a:
- Stolen vehicle check
- Written-off check
- Vehicle financial liability check
- The registration details, and a
- Flood and storm damage check
A cheap price to pay for peace of mind.
BONUS: Consider what accessories it doesn’t have
It’s worth making a list of your must-have accessories BEFORE you inspect:
If you’re after things like an air-conditioner, diesel heater, solar, and roll out awning…
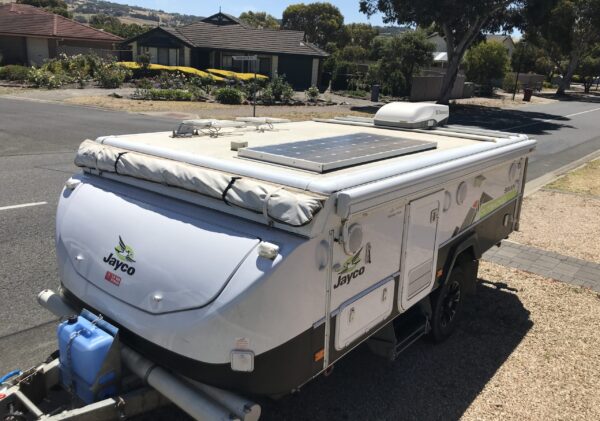
…to have all of these installed after purchase might cost an extra $5K
[but could work out a lot cheaper if you look for a Jayco camper that already has these things done]
Summary: 23 things to look for when buying a Jayco camper trailer
These are the most common things to look for when buying a Jayco camper trailer:
Some of these things are unique to a wind-up campers, others are things you’ll need to look for whenever buying any camper or caravan.
Once you pick it up make sure you get a thorough handover AND then stay a night or two close to where you pick it up
[this way you can easily ask questions or double check things]
Then, once you pick it up… read: 23 Tips For New Jayco Camper Trailer Owners
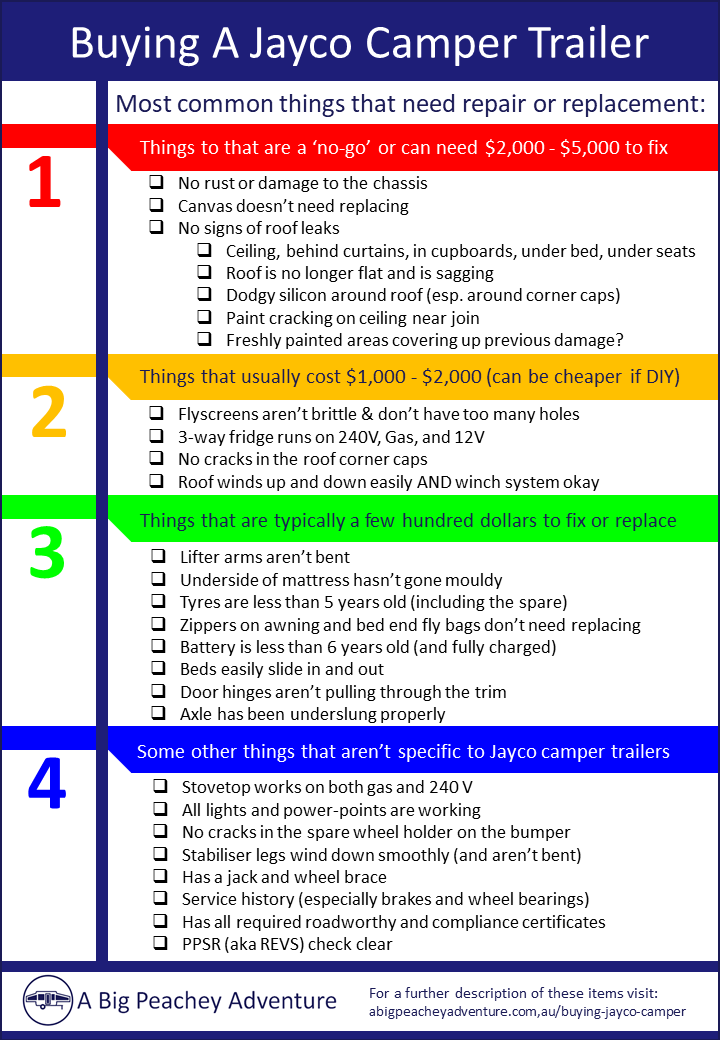
Here’s a handy checklist you can take with you too:

![Buying a Jayco Camper Trailer: 23 Things To Look For [Checklist]](https://abigpeacheyadventure.com.au/wp-content/uploads/2021/07/23-Things-To-Look-For-When-Buying-a-Jayco-Camper-Trailer.png)
![The Best Roll Out Awning for Jayco Camper Trailers [3 Options]](https://abigpeacheyadventure.com.au/wp-content/uploads/2020/05/The-Best-Roll-Out-Awning-for-Jayco-Camper-Trailers-3-Options-440x264.png)
We have just bought a 2016 Jayco outback penguin. When we bought it nothing was charged because it had been stored away. Now we have it home we have no idea how anything works. We have 2 x 100Ah batteries under the bed and 2 solar panels on the roof and an inverter and a whole lot of switches and controls that we cant work out what they are for. I have searched so many youtube articles but I am none the wiser. When we switch the inverter on the red and green light go on but it makes a piercing sound. What is the purpose of the inverter? I’m sorry I’m so clueless, oh its also got an air conditioner that I have no idea how that works either. Will you please help!!!!!
Hi Katerina, the inverter essentially converts the 12V DC current from the batteries to 240V AC current. Then, depending on how it’s set-up, it will either make your powerpoints live, or it will have it’s own powerpoint. Either way, this should let you run small household devices (e.g. coffee machine). Things like the airconditioner will only work when you are connected to 240V power supply from mains (e.g. at home, in the caravan park, or if you have a decent sized generator)